Audiology pure-tone testing is the primary diagnostic procedure designed to evaluate an individual’s hearing ability. This diagnostic test is carried out in an impressionistic manner. It is one such basic aspect that is present in auditory evaluation, from having hearing defects or hearing impairments to disease management.
Audiology Pure-Tone Testing
Pure tone testing is a procedure that analyses the hearing acuity across
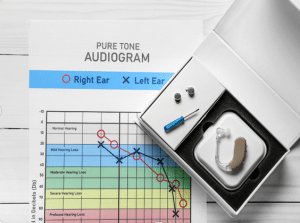
different frequencies, counted in Hertz (Hz), amplitudes, which are measured in decibels (dB). The data that are obtained are generally put on an audiogram, which is a visual depiction of an individual’s hearing loss thresholds, that allows to see the type, power/severity, and layout of any hearing loss parameters.
Indications
Hearing Loss Evaluation: Pure-tone tests gives physician better understanding about performance characteristics, degree, and configuration of hearing loss, whether it’s conductive, mixed or sensorineural.
Clinical Assessment: Subject to examined patients with suspected hearing loss tinnitus, hyperacusis, or balance disorders, pure-tone test is a basic part of the clinical assessment.
Contraindications
Patient Cooperation: Pure-tone testing necessitates the patient’s active engagement and dependable reactions. In cases where the patient is unable or unwilling to participate, the outcomes might lack accuracy. This issue is especially pertinent during assessments involving young children or individuals with cognitive or developmental impairments who may struggle to comprehend or comply with test directives.
Outcomes
Equipment
Audiometer
Headphones
Insert earphones
Bone Conduction Transducer
Calibration Equipment
Speakers
Patient preparation
Appointment Scheduling: Schedule the appointment at a time when the patient is well-rested and relaxed, preferably avoiding peak hours when the clinic may be noisy or busy.
Explanation of the Procedure: Provide the patient with clear information about what the pure-tone test involves, including how the equipment works and what they will be asked to do during the test. Address any concerns or questions they may have.
Instructions for the Test: Explain the specific instructions for the pure-tone test, such as listening for faint tones and responding appropriately (e.g., raising a hand or pressing a button).
Patient position
During pure-tone audiometry, the patient typically sits in a soundproof booth or room wearing headphones. The patient should be comfortably seated, with their back straight and feet flat on the floor.
Air conduction technique
Step1: Preparation:
The audiologist ensures the audiometer, the device generating tones, is properly calibrated for accurate measurements.
The testing room’s noise level is checked to ensure it falls within acceptable limits for reliable testing.
The audiologist explains the test procedure and instructs you to signal when you hear a tone (e.g., raising a hand, pressing a button).
Step 2: Testing Procedure:
Ear Selection: One ear is typically tested at a time. The other ear might be masked with background noise to minimize sound leakage.
Headphone Selection: The audiologist might choose different types of headphones depending on your comfort and age:
Supra-aural: Rest on the top of the ear (common choice).
Circumaural: Encircle the entire ear (better for noise reduction).
Insert earphones: Fit within the ear canal (used for children or those with glasses).
Frequency Selection: Testing starts with a mid-range frequency (around 1000 Hz) where hearing is typically best.
Tone Presentation: The audiologist begins with a clearly audible tone and gradually reduces the intensity until you indicate you can’t hear it anymore. This is repeated for several presentations to ensure accuracy.
Threshold Determination: The lowest intensity at which you can detect the tone 50% of the time is considered your hearing threshold for that frequency.
Frequency Sweep: The process is repeated at various frequencies, typically ranging from 250 Hz (low) to 8000 Hz (high).
Step 3: Result Recording:
Audiogram: Your hearing thresholds for each tested frequency are plotted on an audiogram, a graph that visually represents your hearing ability across the frequency spectrum.
Bone conduction technique
Step 1: Preparation:
The patient sits comfortably in a soundproof booth.
The audiometer, which generates the test tones, is calibrated to ensure accurate readings.
Step 2: Testing procedure:
Bone vibrator placement: A bone oscillator, a small device that vibrates, is placed on the mastoid process, the bony prominence behind the ear. It’s held in place with a headband.
Masking (optional): Sometimes, masking noise is introduced into the non-tested ear through headphones. This prevents the sound from leaking through the skull and being heard in the tested ear.
Frequency selection: The audiologist starts with a specific frequency, typically beginning with low frequencies (around 250 Hz) and progresses upwards (up to 8 kHz).
Tone presentation: The audiologist presents pure tones through the bone vibrator at a soft level, gradually increasing the intensity until the patient indicates they hear the sound.
Threshold determination: The minimum intensity level at which the patient can consistently detect the tone is recorded as the hearing threshold for that frequency.
Step 3: Interpretation
The recorded thresholds at each frequency for both ears (if applicable) are plotted on an audiogram, a graph depicting hearing ability.
Laboratory tests
Pure-Tone Thresholds: Set the sensitivity for a threshold of the softest sound which a human ear can discern from various frequencies (measured in Hertz).
Air Conduction: Evaluates total hearing sensitivity in case of headphones or earphone or can also be done in the form.
Bone Conduction: Measures the function of the inner ear by passing the sounds via bone vibration which is delivered using an oscillator placed on the head side either the mastoid bone or the forehead.
Complications
Patient Cooperation: While adults can sometimes cope with the procedure, children or those who are mentally disabled may have hard time keeping still or comprehending the instruction, which can also affect the results of the study.
Physical Limitations: Patients with documented physical disabilities may be faced with difficulty of positioning themselves appropriately.
Language or Communication Barriers: In cases where the test instruction language is not their native language, non-native patients face an issue of language comprehension which results in inaccurate responses.
Equipment Limitations: When machinery is not working as it should or is not properly calibrated, this can produce inappropriate results. Frequent maintenance and calibration of hearing conservation equipment are crucial to avoid inaccuracy in measurement results.
Audiology pure-tone testing is the primary diagnostic procedure designed to evaluate an individual’s hearing ability. This diagnostic test is carried out in an impressionistic manner. It is one such basic aspect that is present in auditory evaluation, from having hearing defects or hearing impairments to disease management.
Audiology Pure-Tone Testing
Pure tone testing is a procedure that analyses the hearing acuity across
different frequencies, counted in Hertz (Hz), amplitudes, which are measured in decibels (dB). The data that are obtained are generally put on an audiogram, which is a visual depiction of an individual’s hearing loss thresholds, that allows to see the type, power/severity, and layout of any hearing loss parameters.
Hearing Loss Evaluation: Pure-tone tests gives physician better understanding about performance characteristics, degree, and configuration of hearing loss, whether it’s conductive, mixed or sensorineural.
Clinical Assessment: Subject to examined patients with suspected hearing loss tinnitus, hyperacusis, or balance disorders, pure-tone test is a basic part of the clinical assessment.
Patient Cooperation: Pure-tone testing necessitates the patient’s active engagement and dependable reactions. In cases where the patient is unable or unwilling to participate, the outcomes might lack accuracy. This issue is especially pertinent during assessments involving young children or individuals with cognitive or developmental impairments who may struggle to comprehend or comply with test directives.
Audiometer
Headphones
Insert earphones
Bone Conduction Transducer
Calibration Equipment
Speakers
Appointment Scheduling: Schedule the appointment at a time when the patient is well-rested and relaxed, preferably avoiding peak hours when the clinic may be noisy or busy.
Explanation of the Procedure: Provide the patient with clear information about what the pure-tone test involves, including how the equipment works and what they will be asked to do during the test. Address any concerns or questions they may have.
Instructions for the Test: Explain the specific instructions for the pure-tone test, such as listening for faint tones and responding appropriately (e.g., raising a hand or pressing a button).
During pure-tone audiometry, the patient typically sits in a soundproof booth or room wearing headphones. The patient should be comfortably seated, with their back straight and feet flat on the floor.
Step1: Preparation:
The audiologist ensures the audiometer, the device generating tones, is properly calibrated for accurate measurements.
The testing room’s noise level is checked to ensure it falls within acceptable limits for reliable testing.
The audiologist explains the test procedure and instructs you to signal when you hear a tone (e.g., raising a hand, pressing a button).
Step 2: Testing Procedure:
Ear Selection: One ear is typically tested at a time. The other ear might be masked with background noise to minimize sound leakage.
Headphone Selection: The audiologist might choose different types of headphones depending on your comfort and age:
Supra-aural: Rest on the top of the ear (common choice).
Circumaural: Encircle the entire ear (better for noise reduction).
Insert earphones: Fit within the ear canal (used for children or those with glasses).
Frequency Selection: Testing starts with a mid-range frequency (around 1000 Hz) where hearing is typically best.
Tone Presentation: The audiologist begins with a clearly audible tone and gradually reduces the intensity until you indicate you can’t hear it anymore. This is repeated for several presentations to ensure accuracy.
Threshold Determination: The lowest intensity at which you can detect the tone 50% of the time is considered your hearing threshold for that frequency.
Frequency Sweep: The process is repeated at various frequencies, typically ranging from 250 Hz (low) to 8000 Hz (high).
Step 3: Result Recording:
Audiogram: Your hearing thresholds for each tested frequency are plotted on an audiogram, a graph that visually represents your hearing ability across the frequency spectrum.
Step 1: Preparation:
The patient sits comfortably in a soundproof booth.
The audiometer, which generates the test tones, is calibrated to ensure accurate readings.
Step 2: Testing procedure:
Bone vibrator placement: A bone oscillator, a small device that vibrates, is placed on the mastoid process, the bony prominence behind the ear. It’s held in place with a headband.
Masking (optional): Sometimes, masking noise is introduced into the non-tested ear through headphones. This prevents the sound from leaking through the skull and being heard in the tested ear.
Frequency selection: The audiologist starts with a specific frequency, typically beginning with low frequencies (around 250 Hz) and progresses upwards (up to 8 kHz).
Tone presentation: The audiologist presents pure tones through the bone vibrator at a soft level, gradually increasing the intensity until the patient indicates they hear the sound.
Threshold determination: The minimum intensity level at which the patient can consistently detect the tone is recorded as the hearing threshold for that frequency.
Step 3: Interpretation
The recorded thresholds at each frequency for both ears (if applicable) are plotted on an audiogram, a graph depicting hearing ability.
Pure-Tone Thresholds: Set the sensitivity for a threshold of the softest sound which a human ear can discern from various frequencies (measured in Hertz).
Air Conduction: Evaluates total hearing sensitivity in case of headphones or earphone or can also be done in the form.
Bone Conduction: Measures the function of the inner ear by passing the sounds via bone vibration which is delivered using an oscillator placed on the head side either the mastoid bone or the forehead.
Patient Cooperation: While adults can sometimes cope with the procedure, children or those who are mentally disabled may have hard time keeping still or comprehending the instruction, which can also affect the results of the study.
Physical Limitations: Patients with documented physical disabilities may be faced with difficulty of positioning themselves appropriately.
Language or Communication Barriers: In cases where the test instruction language is not their native language, non-native patients face an issue of language comprehension which results in inaccurate responses.
Equipment Limitations: When machinery is not working as it should or is not properly calibrated, this can produce inappropriate results. Frequent maintenance and calibration of hearing conservation equipment are crucial to avoid inaccuracy in measurement results.
Both our subscription plans include Free CME/CPD AMA PRA Category 1 credits.
Digital Certificate PDF
On course completion, you will receive a full-sized presentation quality digital certificate.
medtigo Simulation
A dynamic medical simulation platform designed to train healthcare professionals and students to effectively run code situations through an immersive hands-on experience in a live, interactive 3D environment.
medtigo Points
medtigo points is our unique point redemption system created to award users for interacting on our site. These points can be redeemed for special discounts on the medtigo marketplace as well as towards the membership cost itself.
Community Forum post/reply = 5 points
*Redemption of points can occur only through the medtigo marketplace, courses, or simulation system. Money will not be credited to your bank account. 10 points = $1.
All Your Certificates in One Place
When you have your licenses, certificates and CMEs in one place, it's easier to track your career growth. You can easily share these with hospitals as well, using your medtigo app.