Alar rim retraction is a condition where the lower border of the nostril is elevated. This has an unattractive nasal configuration and may be functionally significant. It may result from heredity, previous rhinoplasty, trauma, or other facial illnesses. Although most are performed for aesthetic reasons, rhinoplasty, as applied to small nostrils, appears designed to reverse alar rim retraction by reshaping the nostril rim to the correct curvature and position.
Indications
Aesthetic deformity: The primary purpose of alar rim retraction rhinoplasty is cosmetic, where patients want to modify the shape, size, or general aesthetics of their nose.
Patient request for a change in nasal shape: Alar rim grafting can be used with rhinoplasty to get the desired cosmetic result, such as a more defined nasal tip.
Improvement of anatomic nasal airway obstruction: Alar retraction can sometimes play a role in nasal valve inadequacy to a level where breathing becomes problematic. In these cases, alar rim retraction rhinoplasty can help direct airflow through the nasal passageway.
Contraindications
Unrealistic patient expectations: Surgery could be a constructive mode aiding the treatment of certain diseases, but alar rim retraction rhinoplasty can fix the nasal contour deformity and improve the nasal cosmetic prominence but it cannot create an ideal nose.
Recent rhinoplasty: Ideally, surgeons try to warn the patient against any other surgery to be done soon after the rhinoplasty surgery within a year.
Poor health: It consists of diseases, medical conditions, and complications that make surgery high-risk and thus not advisable. Certain conditions should be kept under controlled, such as diabetes, major bleeding disorders and severe heart diseases.
Outcomes
Equipment
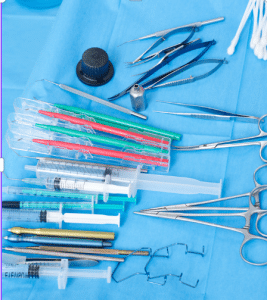
Surgical equipments
Scalpel
Scissors
Suture needles and sutures
Cartilage grafting materials
Spreader grafts
Alar rim grafts
Cauterizing devices
Bandages
Patient preparation
Preoperative Planning:
Collect pictures of your nose from different angles may be provided by your surgeon.
They may also generate other forms of computer imaging that you can use to look at your potential outcomes.
To approve your fitness for surgery, you will be required to undergo a series of blood tests and chest X-rays to approve.
It is also recommended that you should abstain from smoking for minimum of several weeks before the surgery because smoking slows down the healing process.
Graft Placement Technique
Step 1: Preoperative Assessment: Evaluation: Evaluating the amount of retraction, the width of the nasal sill or rim, skin thickness, and prior surgeries. Photography: Taking photographs aid in planning as well as documentation. Patient Discussion: Explaining the specific goals for the session, and what the patient might expect and, most importantly, the possible outcomes.
Step 2: Anesthesia: Local Anesthesia with Sedation or General Anesthesia: In some cases based on the type of procedure and patient preference.
Step 3: Incision and Exposure: Open Rhinoplasty Approach: It is used for better view and understanding and easy access to components such as. Marginal Incision: This is sutured at the alar rim with the medial aspect being used when a direct grafting is made. Elevation of Soft Tissue: Careful analysis to get further more related to the second one overlaying cartilages and middle third nasal framework operation that should not worsen the existing injury.
Step 4: Graft placement Alar batten grafts: In this method the alar borders are surgically lined with small pieces of cartilage typically harvested from the septum. The grafts which are used to support the alar cartilages both bud the alar cartilages outward and downward and in turn, make the nostrils larger.
Composite dermal-cartilage grafts: The skin and cartilage are taken from the ear, and the composite graft is formed or created. The part of the cartilage is carved and moulded to make a supportive structure while skin is put in place in fashioning a new liner for the nostril.
Step 5: Graft Placement: Pocket Creation: The area to be taken is then retracted and a corresponding flap is excised and given an exact dimension to fit the graft. Securing the Graft: The graft is then inserted in a pocket previously created and if needed the graft is sutured to avoid movement and to ensure that it occupies the proper position. Suturing Techniques: To fix the graft to the underlying structures and alar rim with fine and nonabsorbable sutures should be used.
Step 6: Closure: Layered Closure: Sutures should be placed delicately and in layers to enable proper healing further it reduces scar prominence.
Step 7: Postoperative Care:
Provide antibiotic medications and regular follow up should be done.
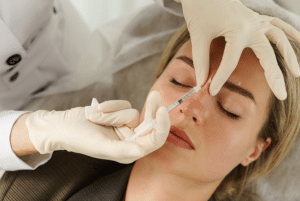
Injection of Dermal Fillers
Step 1: Patient Assessment:
Detailed evaluation: Check the extent of alar retraction, the equality of the nostril aperture, skin and deep tissue quality. Photographs: This is the best way to represent the condition and treatment plan before procedure through capturing photos from different angles. Discussion: Describe how this is done, what is expected to be achieved and likely consequences or side effects to the patient.
Step 2: Choice of Filler: Hyaluronic Acid (HA) Fillers: Some of them include Juvederm or Restylane are preferred choices. Calcium Hydroxylapatite (CaHA) Fillers: Such as Radiesse, could also be used and with more added lasting effects.
Dermal filler injection
Step 3: Injection Technique:
Anesthesia: Topical anesthesia is preferred choice. Injection Sites: On the alar rim, injections are usually given at several positions and locations in equal intervals to ensure adequate dispersion of the filler to the areas where it will form a natural contour once injected. Depth and Amount: To attain better results and prevent side effects including filling irregularities and asymmetry, it is imperative that injection sites and filler volume are closely monitored. Technique: A microcannula may have a decreased risk on causing the bruise and give better distribution of the filler.
Step 4: Post-Treatment Care:
Immediate Aftercare: For the swelling to reduce, use of ice is recommended and advice the patient to ensure that he or she does not apply any pressure on the affected area.
Follow-up: You should go to your doctor’s clinic or hospital to check your result.
Laboratory tests
X-rays: In case the surgery is to be performed, X-rays are also helpful in identifying the regions of the nose that has more bone content. CT scans: Using CT scans, the anatomy of the nasal passage can be identified in detailed, with anatomic structures such as the bones, cartilage, and soft tissue included. It can also help in identifying why the alar complex has retracted and how it is going to be treated during surgery.
Complications
Bleeding and bruising: It is common to have some bleeding with any type of surgery, and with most procedures bleeding should be relatively mild and clear up within one to two weeks.
Infection: Some possible risks of inflection are there which are usually an outcome of surgery. New signs of worsening of an illness might be redness, overheating, pain in the wound and fever.
Difficulty breathing: The alar rim retraction can sometimes results to annular constriction, increasing the nasal valve and thus bringing about breathing issues.
Scarring: In the majority of cases, it is possible that the scar left behind by the rhinoplasty specialist is barely noticeable since even hairline usually comes over it. But there are some points it is most considerable being keloid scarring; it is a kind of thickened raised scar tissues.
»
Home » Procedure » Alar Rim Retraction Rhinoplasty
Alar Rim Retraction Rhinoplasty
Updated :
December 10, 2025
Alar rim retraction is a condition where the lower border of the nostril is elevated. This has an unattractive nasal configuration and may be functionally significant. It may result from heredity, previous rhinoplasty, trauma, or other facial illnesses. Although most are performed for aesthetic reasons, rhinoplasty, as applied to small nostrils, appears designed to reverse alar rim retraction by reshaping the nostril rim to the correct curvature and position.
Aesthetic deformity: The primary purpose of alar rim retraction rhinoplasty is cosmetic, where patients want to modify the shape, size, or general aesthetics of their nose.
Patient request for a change in nasal shape: Alar rim grafting can be used with rhinoplasty to get the desired cosmetic result, such as a more defined nasal tip.
Improvement of anatomic nasal airway obstruction: Alar retraction can sometimes play a role in nasal valve inadequacy to a level where breathing becomes problematic. In these cases, alar rim retraction rhinoplasty can help direct airflow through the nasal passageway.
Unrealistic patient expectations: Surgery could be a constructive mode aiding the treatment of certain diseases, but alar rim retraction rhinoplasty can fix the nasal contour deformity and improve the nasal cosmetic prominence but it cannot create an ideal nose.
Recent rhinoplasty: Ideally, surgeons try to warn the patient against any other surgery to be done soon after the rhinoplasty surgery within a year.
Poor health: It consists of diseases, medical conditions, and complications that make surgery high-risk and thus not advisable. Certain conditions should be kept under controlled, such as diabetes, major bleeding disorders and severe heart diseases.
Surgical equipments
Scalpel
Scissors
Suture needles and sutures
Cartilage grafting materials
Spreader grafts
Alar rim grafts
Cauterizing devices
Bandages
Preoperative Planning:
Collect pictures of your nose from different angles may be provided by your surgeon.
They may also generate other forms of computer imaging that you can use to look at your potential outcomes.
To approve your fitness for surgery, you will be required to undergo a series of blood tests and chest X-rays to approve.
It is also recommended that you should abstain from smoking for minimum of several weeks before the surgery because smoking slows down the healing process.
Step 1: Preoperative Assessment: Evaluation: Evaluating the amount of retraction, the width of the nasal sill or rim, skin thickness, and prior surgeries. Photography: Taking photographs aid in planning as well as documentation. Patient Discussion: Explaining the specific goals for the session, and what the patient might expect and, most importantly, the possible outcomes.
Step 2: Anesthesia: Local Anesthesia with Sedation or General Anesthesia: In some cases based on the type of procedure and patient preference.
Step 3: Incision and Exposure: Open Rhinoplasty Approach: It is used for better view and understanding and easy access to components such as. Marginal Incision: This is sutured at the alar rim with the medial aspect being used when a direct grafting is made. Elevation of Soft Tissue: Careful analysis to get further more related to the second one overlaying cartilages and middle third nasal framework operation that should not worsen the existing injury.
Step 4: Graft placement Alar batten grafts: In this method the alar borders are surgically lined with small pieces of cartilage typically harvested from the septum. The grafts which are used to support the alar cartilages both bud the alar cartilages outward and downward and in turn, make the nostrils larger.
Composite dermal-cartilage grafts: The skin and cartilage are taken from the ear, and the composite graft is formed or created. The part of the cartilage is carved and moulded to make a supportive structure while skin is put in place in fashioning a new liner for the nostril.
Step 5: Graft Placement: Pocket Creation: The area to be taken is then retracted and a corresponding flap is excised and given an exact dimension to fit the graft. Securing the Graft: The graft is then inserted in a pocket previously created and if needed the graft is sutured to avoid movement and to ensure that it occupies the proper position. Suturing Techniques: To fix the graft to the underlying structures and alar rim with fine and nonabsorbable sutures should be used.
Step 6: Closure: Layered Closure: Sutures should be placed delicately and in layers to enable proper healing further it reduces scar prominence.
Step 7: Postoperative Care:
Provide antibiotic medications and regular follow up should be done.
Step 1: Patient Assessment:
Detailed evaluation: Check the extent of alar retraction, the equality of the nostril aperture, skin and deep tissue quality. Photographs: This is the best way to represent the condition and treatment plan before procedure through capturing photos from different angles. Discussion: Describe how this is done, what is expected to be achieved and likely consequences or side effects to the patient.
Step 2: Choice of Filler: Hyaluronic Acid (HA) Fillers: Some of them include Juvederm or Restylane are preferred choices. Calcium Hydroxylapatite (CaHA) Fillers: Such as Radiesse, could also be used and with more added lasting effects.
Dermal filler injection
Step 3: Injection Technique:
Anesthesia: Topical anesthesia is preferred choice. Injection Sites: On the alar rim, injections are usually given at several positions and locations in equal intervals to ensure adequate dispersion of the filler to the areas where it will form a natural contour once injected. Depth and Amount: To attain better results and prevent side effects including filling irregularities and asymmetry, it is imperative that injection sites and filler volume are closely monitored. Technique: A microcannula may have a decreased risk on causing the bruise and give better distribution of the filler.
Step 4: Post-Treatment Care:
Immediate Aftercare: For the swelling to reduce, use of ice is recommended and advice the patient to ensure that he or she does not apply any pressure on the affected area.
Follow-up: You should go to your doctor’s clinic or hospital to check your result.
X-rays: In case the surgery is to be performed, X-rays are also helpful in identifying the regions of the nose that has more bone content. CT scans: Using CT scans, the anatomy of the nasal passage can be identified in detailed, with anatomic structures such as the bones, cartilage, and soft tissue included. It can also help in identifying why the alar complex has retracted and how it is going to be treated during surgery.
Bleeding and bruising: It is common to have some bleeding with any type of surgery, and with most procedures bleeding should be relatively mild and clear up within one to two weeks.
Infection: Some possible risks of inflection are there which are usually an outcome of surgery. New signs of worsening of an illness might be redness, overheating, pain in the wound and fever.
Difficulty breathing: The alar rim retraction can sometimes results to annular constriction, increasing the nasal valve and thus bringing about breathing issues.
Scarring: In the majority of cases, it is possible that the scar left behind by the rhinoplasty specialist is barely noticeable since even hairline usually comes over it. But there are some points it is most considerable being keloid scarring; it is a kind of thickened raised scar tissues.
Both our subscription plans include Free CME/CPD AMA PRA Category 1 credits.
Digital Certificate PDF
On course completion, you will receive a full-sized presentation quality digital certificate.
medtigo Simulation
A dynamic medical simulation platform designed to train healthcare professionals and students to effectively run code situations through an immersive hands-on experience in a live, interactive 3D environment.
medtigo Points
medtigo points is our unique point redemption system created to award users for interacting on our site. These points can be redeemed for special discounts on the medtigo marketplace as well as towards the membership cost itself.
Community Forum post/reply = 5 points
*Redemption of points can occur only through the medtigo marketplace, courses, or simulation system. Money will not be credited to your bank account. 10 points = $1.
All Your Certificates in One Place
When you have your licenses, certificates and CMEs in one place, it's easier to track your career growth. You can easily share these with hospitals as well, using your medtigo app.