Cephalic vein cutdown is a minimally invasive technique applied in surgery to identify the cephalic vein, situated in the lateral part of the forearm and arm. This technique is most helpful in cases where obtaining PVA is challenging due to poor visibility of the veins, collapsed veins, and patient-dependent factors including obesity and dehydration.
Indications
Difficult Venous Access: In patients when peripheral veins are difficult to visualize due to obesity, chronic diseases, dehydration, retraction due to previous attempts in a particular area, thrombosis, and scarring.
Need for Long-term Access: The indications of the midline jugular vein catheter include patients who need long term IV therapy like chemotherapy or parenteral nutrition or antibiotic therapy where CVC or port cannot be used.
Emergency Situations: Under certain circumstances when access to the venous system is urgent and peripheral access is not possible, a successful cutdown can be performed for quick achievement.
Patients with Poor Peripheral Veins: For diabetic patients, patients with chronic kidney disease or patients who have a history of having numerous blood samples drawn, which makes getting an Intravenous access a challenge.
Intraoperative or Procedural Use: During surgeries or procedures where continuous venous access is required, and peripheral access is insufficient.
Contraindications
Infection: The potential for injecting pathogens into the bloodstream is increased in patients who have an active infection at the site of cutdown or adjacent areas.
Vascular Access Difficulties: Severe scarring, vascular anomalies, or prior surgeries that may have compromised the area can make the cutdown procedure more risky or difficult.
Coagulopathy: Thus, patients of these categories: Bleeding disorder and patient on anticoagulants for various diseases are more prone to bleeding events.
Severe Peripheral Vascular Disease: Peripheral vascular disease may reduce the chances of accessing the vein and raise the likelihood of adverse effects.
Allergy to Anesthetic Agents: In cases where the patient has an allergy to local anesthetics, the patient would not be recommended for a local anesthetic during the procedure.
Presence of Thrombosis: Evidence of thrombosis in the cephalic vein or nearby veins can make the procedure ineffective and risky.
Outcomes
Periprocedural care
Equipments
Scalpel
Scissors
Hemostatic Forceps
Needles and Suture Material
Drape and Sterile Covers
Local Anesthetic
Syringe and Needle
Towel or Gauze
Venous Catheter
Ultrasound Machine (optional)
Sterile Gloves
Patient preparation
Pre-Procedure Assessment
Medical History: Ask the patient about allergies, current medications, previous surgeries, and personal history of bleeding problems.
Physical Examination: Carry out an assessment by paying special attention to the upper limbs with a view of identifying the nature and location of the cephalic vein.
Vital Signs: Record the patient’s blood pressure, pulse, temperature and rate of respiration.
Patient position
Supine Position: The patient is in the supine position on either examination bench or on an operating table.
Arm Positioning: This facilitates viewing of the cephalic vein at the wrist or distal forearm where the cutdown will be carried on the arm on the side of the patient facing the image, commonly the right arm.
Direct cutdown approach
Step 1: Identifying the Cephalic Vein: Locate the cephalic vein which lies just off the lateral part of the forearm or wrist. It may be more seen in persons with lesser subcutaneous tissue or those using tourniquet while taking a blood sample. Mark the vein’s location to guide your incision.
Step 2: Anesthesia: Local anesthetic agent should be injected around the area of cephalic vein. This step is important for the patient because it decreases the amount of pain during incision and procedure within the affected tissue.
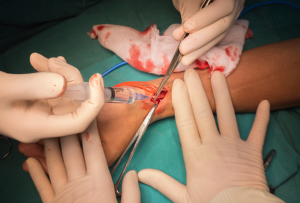
Step 3: Making the Incision: With a scalpel, you’ll carefully open the skin and cut a straight line about 1-2 centimeters over the vein. The skin should be incised just enough to gain entrance to the venous space with undue pressure and trauma to the neighbouring tissues.
Cephalic vein cut down
Step 4: Dissecting to the Vein: Perform sharp dissection through the layer separating the subcutaneous tissue from the skin using scissors or making use of the blunt dissection tool in an effort not to remove nerves and Arterial structures. Make sure homeostasis by using gentle pressure on the wound site, or with the help of adopted hemostatic forceps.
Step 5: Exposing the Vein: When the cephalic vein is located the tissue should be moved out of the way to expose it better. Make sure not to traumatise the vein or the surrounding tissue. If there is more bleeding than minor oozing, you may apply hemostatic clamps.
Step 6: Cannulation: Kink the cephalic vein, and then turn the hub of the sterile IV catheter slightly to accommodate it, to allow the device to slide easily into the vein. Insert the catheter further into the vein until there is flashback of blood in the flashback chamber. Secure the catheter in place.
Step 7: Closure: Once the catheter is in position wash the site of the puncture with sterile saline. Suture or apply adhesive strips to counteract the wound effectively, again be sure to bring the edges of the skin together to heal well.
Step 8: Dressing: A sterile dressing should be done over the operated site for protective purpose against infections.
Step 9: Post-Procedure Care
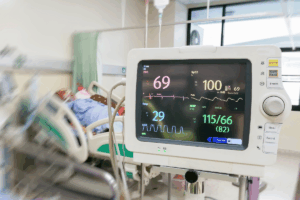
Monitoring: Assess for immediate complication which may include bleeding, formation of hematoma or clinical indication of infection.
Monitor vital signs and ensure the IV line is patent and functioning correctly.
Patient Instructions: Instruct the patient about wound care and about what to look out for, in terms of signs of infection and when to return for follow up.
Percutaneous approach
Step 1: Preparation:
The procedure will then be explained to the patient and consent to be obtained from the patient.
Position the patient comfortably, usually supine, preferably lying flat on the back with the affected arm outstretched.
Wash the hands and put on sterile gloves as necessary.
Step 2: Site Identification: Palpate the cephalic vein in the forearm or the wrist. Sometimes, an ultrasound can also be employed to examine the position, and caliber of the vein.
Skin Preparation: It’s important to wash the site with an antiseptic solution to minimize the possibility of an infection erupting.
Step 3: Local Anesthesia: Local anaesthetic can be given around the planned site of insertion to avoid pain during the process.
Cutdown: Cut the skin in an area near the vein which should not be more that 1-2 cm in length. Slowly and meticulously step-by-step make an incision through the subcutaneous tissue to isolate the cephalic vein.
Step 4: Accessing the Vein: Take the cephalic vein between the thumb and the index finger of the left hand using smallest possible hemostats or forceps.
Put a dilator or a catheter into the vein.
Step 5: Insertion of Catheter: If using the guidewire, then it is inserted into the vein and then shortly followed by the catheter. Confirm proper placement of the catheter, often by aspirating for blood or using ultrasound guidance.
Secure the Catheter: Fix the catheter position by stitching or bandaging the area to avoid shifting.
Put a sterile dressing over the site.
Step 6: Post-procedure Care: Closely observe the patient for any of the complications, particularly bleeding or infection.
Record the size and kind of catheter employed in the process, besides any adverse side effects.
Complications
Infection: Like all interventions, the chance of having an infection from a site point or even the bloodstream (sepsis) is high at the point of incision.
Bleeding: There is often significant bleeding during or at the end of the procedure. This is especially the case if the nearby artery accidentally gets perforated.
Hematoma: They are edema and discomfort at the site of the cut down due to accumulation of blood in the extracellular space.
Nerve Injury: Since the nerves are located close to the cephalic vein there is every possibility of damaging them during the procedure and this may lead to pain, numbness and or weakness of the arm.
Thrombosis: Intravenous coagulation can form a thrombus (blood clot) within the vein which results to venous obstruction.
Laceration of the Vein: Improper technique can lead to laceration of the vein, which may necessitate further intervention.
Catheter-related Complications: These complications involving catheter misplacement, malfunction of the catheter, or migration of the catheter can develop.
Cephalic vein cutdown is a minimally invasive technique applied in surgery to identify the cephalic vein, situated in the lateral part of the forearm and arm. This technique is most helpful in cases where obtaining PVA is challenging due to poor visibility of the veins, collapsed veins, and patient-dependent factors including obesity and dehydration.
Difficult Venous Access: In patients when peripheral veins are difficult to visualize due to obesity, chronic diseases, dehydration, retraction due to previous attempts in a particular area, thrombosis, and scarring.
Need for Long-term Access: The indications of the midline jugular vein catheter include patients who need long term IV therapy like chemotherapy or parenteral nutrition or antibiotic therapy where CVC or port cannot be used.
Emergency Situations: Under certain circumstances when access to the venous system is urgent and peripheral access is not possible, a successful cutdown can be performed for quick achievement.
Patients with Poor Peripheral Veins: For diabetic patients, patients with chronic kidney disease or patients who have a history of having numerous blood samples drawn, which makes getting an Intravenous access a challenge.
Intraoperative or Procedural Use: During surgeries or procedures where continuous venous access is required, and peripheral access is insufficient.
Infection: The potential for injecting pathogens into the bloodstream is increased in patients who have an active infection at the site of cutdown or adjacent areas.
Vascular Access Difficulties: Severe scarring, vascular anomalies, or prior surgeries that may have compromised the area can make the cutdown procedure more risky or difficult.
Coagulopathy: Thus, patients of these categories: Bleeding disorder and patient on anticoagulants for various diseases are more prone to bleeding events.
Severe Peripheral Vascular Disease: Peripheral vascular disease may reduce the chances of accessing the vein and raise the likelihood of adverse effects.
Allergy to Anesthetic Agents: In cases where the patient has an allergy to local anesthetics, the patient would not be recommended for a local anesthetic during the procedure.
Presence of Thrombosis: Evidence of thrombosis in the cephalic vein or nearby veins can make the procedure ineffective and risky.
Equipments
Scalpel
Scissors
Hemostatic Forceps
Needles and Suture Material
Drape and Sterile Covers
Local Anesthetic
Syringe and Needle
Towel or Gauze
Venous Catheter
Ultrasound Machine (optional)
Sterile Gloves
Patient preparation
Pre-Procedure Assessment
Medical History: Ask the patient about allergies, current medications, previous surgeries, and personal history of bleeding problems.
Physical Examination: Carry out an assessment by paying special attention to the upper limbs with a view of identifying the nature and location of the cephalic vein.
Vital Signs: Record the patient’s blood pressure, pulse, temperature and rate of respiration.
Patient position
Supine Position: The patient is in the supine position on either examination bench or on an operating table.
Arm Positioning: This facilitates viewing of the cephalic vein at the wrist or distal forearm where the cutdown will be carried on the arm on the side of the patient facing the image, commonly the right arm.
Step 1: Identifying the Cephalic Vein: Locate the cephalic vein which lies just off the lateral part of the forearm or wrist. It may be more seen in persons with lesser subcutaneous tissue or those using tourniquet while taking a blood sample. Mark the vein’s location to guide your incision.
Step 2: Anesthesia: Local anesthetic agent should be injected around the area of cephalic vein. This step is important for the patient because it decreases the amount of pain during incision and procedure within the affected tissue.
Step 3: Making the Incision: With a scalpel, you’ll carefully open the skin and cut a straight line about 1-2 centimeters over the vein. The skin should be incised just enough to gain entrance to the venous space with undue pressure and trauma to the neighbouring tissues.
Cephalic vein cut down
Step 4: Dissecting to the Vein: Perform sharp dissection through the layer separating the subcutaneous tissue from the skin using scissors or making use of the blunt dissection tool in an effort not to remove nerves and Arterial structures. Make sure homeostasis by using gentle pressure on the wound site, or with the help of adopted hemostatic forceps.
Step 5: Exposing the Vein: When the cephalic vein is located the tissue should be moved out of the way to expose it better. Make sure not to traumatise the vein or the surrounding tissue. If there is more bleeding than minor oozing, you may apply hemostatic clamps.
Step 6: Cannulation: Kink the cephalic vein, and then turn the hub of the sterile IV catheter slightly to accommodate it, to allow the device to slide easily into the vein. Insert the catheter further into the vein until there is flashback of blood in the flashback chamber. Secure the catheter in place.
Step 7: Closure: Once the catheter is in position wash the site of the puncture with sterile saline. Suture or apply adhesive strips to counteract the wound effectively, again be sure to bring the edges of the skin together to heal well.
Step 8: Dressing: A sterile dressing should be done over the operated site for protective purpose against infections.
Step 9: Post-Procedure Care
Monitoring: Assess for immediate complication which may include bleeding, formation of hematoma or clinical indication of infection.
Monitor vital signs and ensure the IV line is patent and functioning correctly.
Patient Instructions: Instruct the patient about wound care and about what to look out for, in terms of signs of infection and when to return for follow up.
Step 1: Preparation:
The procedure will then be explained to the patient and consent to be obtained from the patient.
Position the patient comfortably, usually supine, preferably lying flat on the back with the affected arm outstretched.
Wash the hands and put on sterile gloves as necessary.
Step 2: Site Identification: Palpate the cephalic vein in the forearm or the wrist. Sometimes, an ultrasound can also be employed to examine the position, and caliber of the vein.
Skin Preparation: It’s important to wash the site with an antiseptic solution to minimize the possibility of an infection erupting.
Step 3: Local Anesthesia: Local anaesthetic can be given around the planned site of insertion to avoid pain during the process.
Cutdown: Cut the skin in an area near the vein which should not be more that 1-2 cm in length. Slowly and meticulously step-by-step make an incision through the subcutaneous tissue to isolate the cephalic vein.
Step 4: Accessing the Vein: Take the cephalic vein between the thumb and the index finger of the left hand using smallest possible hemostats or forceps.
Put a dilator or a catheter into the vein.
Step 5: Insertion of Catheter: If using the guidewire, then it is inserted into the vein and then shortly followed by the catheter. Confirm proper placement of the catheter, often by aspirating for blood or using ultrasound guidance.
Secure the Catheter: Fix the catheter position by stitching or bandaging the area to avoid shifting.
Put a sterile dressing over the site.
Step 6: Post-procedure Care: Closely observe the patient for any of the complications, particularly bleeding or infection.
Record the size and kind of catheter employed in the process, besides any adverse side effects.
Complications
Infection: Like all interventions, the chance of having an infection from a site point or even the bloodstream (sepsis) is high at the point of incision.
Bleeding: There is often significant bleeding during or at the end of the procedure. This is especially the case if the nearby artery accidentally gets perforated.
Hematoma: They are edema and discomfort at the site of the cut down due to accumulation of blood in the extracellular space.
Nerve Injury: Since the nerves are located close to the cephalic vein there is every possibility of damaging them during the procedure and this may lead to pain, numbness and or weakness of the arm.
Thrombosis: Intravenous coagulation can form a thrombus (blood clot) within the vein which results to venous obstruction.
Laceration of the Vein: Improper technique can lead to laceration of the vein, which may necessitate further intervention.
Catheter-related Complications: These complications involving catheter misplacement, malfunction of the catheter, or migration of the catheter can develop.
Both our subscription plans include Free CME/CPD AMA PRA Category 1 credits.
Digital Certificate PDF
On course completion, you will receive a full-sized presentation quality digital certificate.
medtigo Simulation
A dynamic medical simulation platform designed to train healthcare professionals and students to effectively run code situations through an immersive hands-on experience in a live, interactive 3D environment.
medtigo Points
medtigo points is our unique point redemption system created to award users for interacting on our site. These points can be redeemed for special discounts on the medtigo marketplace as well as towards the membership cost itself.
Community Forum post/reply = 5 points
*Redemption of points can occur only through the medtigo marketplace, courses, or simulation system. Money will not be credited to your bank account. 10 points = $1.
All Your Certificates in One Place
When you have your licenses, certificates and CMEs in one place, it's easier to track your career growth. You can easily share these with hospitals as well, using your medtigo app.