With the rise in the use of invasive monitoring tools and aggressive fluid resuscitation strategies, the ability to quickly and accurately establish vascular access has become essential for physicians working in emergency and critical care settings.
While peripheral veins can provide a pathway to the central venous system, using them often involves threading long catheters through superficial veins, which may be difficult to locate during emergencies. In contrast, the internal jugular, subclavian, and femoral veins have consistent anatomical locations, making them more reliable options for cannulation in critically ill patients.
Each central venous access site carries the risk of complications and potential failure, often worsened by the challenging conditions under which access must be obtained. Earlier research suggested lower rates of catheter-related bloodstream infections (CRBSIs) with internal jugular or subclavian access compared to femoral access, but later studies (2008–2010) found no significant differences among the three sites.
Femoral vein cannulation is among the most frequently used techniques in emergency settings. Success with this method relies on careful patient selection, thorough anatomical knowledge, and typically employs the modified Seldinger technique.
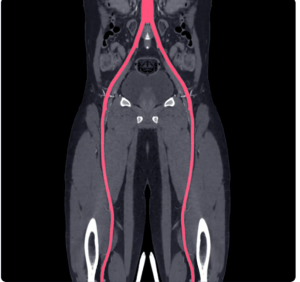
Figure 1: Femoral artery
Indications
Femoral venous catheterization is commonly indicated in several emergency situations. It provides rapid central access for drug delivery during cardiopulmonary resuscitation (CPR) and is recommended in trauma patients, particularly when peripheral IV access is difficult or delayed. In cases of suspected superior vena cava injury, it is preferred over supraclavicular access. Additional uses include urgent hemodialysis, hemoperfusion in drug overdose, and central venous pressure monitoring. Guidelines for safe and effective central venous access have been published by organizations such as the American Society of Anesthesiologists (2012, updated 2020) and the Association of Anaesthetists of Great Britain and Ireland (2016).
Contraindications
Femoral central venous access is contraindicated in certain situations. Absolute contraindications include suspected or confirmed injury or thrombosis of the femoral, iliac, or inferior vena cava veins, and in patients who are ambulatory, due to the increased risk of catheter complications like fracture or migration.
Relative contraindications involve conditions that may increase procedural risk or reduce success, such as bleeding disorders (inherited or due to anticoagulant use), anatomical distortion from injury or deformity, prior long-term catheterization, inability to locate the femoral artery by palpation, a history of vasculitis, previous sclerotherapy, or prior radiation exposure in the area.
Outcomes
Improved Safety and Efficacy: Modern FCVA techniques now include ultrasound-guided insertion, intraprocedural tip location (via TTE, IC-ECG), and catheter tunneling, significantly reducing risks of infection, thrombosis, and malposition.
Redefinition of “Central” Access: FCVA is only considered a central access if the catheter tip is in the inferior vena cava (IVC) or right atrium; otherwise, it’s deemed “peripheral” and unsuitable for certain infusions.
Optimized Emergency vs Elective Use: Emergency FCVA (short-term, groin exit site) carries higher infection risk and is recommended to be removed within 48 hours. Elective FCVA uses protocols like SIF, with better insertion technique, mid-thigh exit site, and longer catheter lengths to reduce complications.
New Anatomical Access Points: Besides the common femoral vein, access via the superficial femoral, popliteal, and saphenous veins is now feasible using ultrasound, expanding indications.
Tunneling Techniques: Tunneling (especially to mid-thigh) reduces bacterial contamination and dislodgement, improving outcomes especially in long-term and pediatric care.
Effective Tip Location: Real-time tip location using transhepatic ultrasound, subcostal views, or intracavitary ECG enhances accuracy, making post-procedural X-rays obsolete.
Expanded Indications: FCVA is now used beyond superior vena cava obstruction—especially in palliative care, prone ventilated COVID patients, and cognitively impaired patients needing secure, low-maintenance central access.
Equipment
Antiseptic solution (e.g., povidone-iodine or chlorhexidine) for skin preparation
Sterile draping materials and towels
Sterile gloves, gown, surgical mask, and cap
1% lidocaine for local anesthesia
26-gauge needle with a 2–5 mL syringe for anesthetic infiltration
Finder needle (26-gauge)
20- to 22-gauge needle with a 10 mL syringe for vascular access
J-tip guidewire
No. 11 blade scalpel
Dilator to expand skin and soft tissue at the insertion site
Central venous catheter (single or multiple lumens)
3-0 or 4-0 silk or nylon suture for securing the catheter
Locate the anatomical landmarks and disinfect the puncture site using alcohol followed by a povidone-iodine or chlorhexidine solution. Administer 2–5 mL of 1% lidocaine with a 26-gauge needle to numb the skin and underlying tissue. In emergencies involving unresponsive patients, anesthesia may be skipped to allow rapid vascular access for urgent treatment.
Patient Position
For femoral vein catheter insertion, position the patient lying flat on their back with the hip kept straight and aligned.
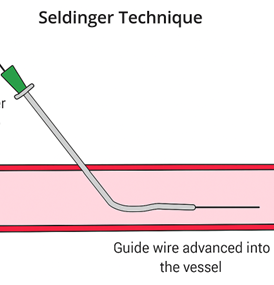
Seldinger technique
Step 1-Patient Positioning: Begin by laying the patient flat on their back (supine position), ensuring the groin area is fully exposed. Maintain the hip in a straight, neutral alignment to facilitate easy access to the femoral vein.
Step 2-Site Preparation and Draping: Thoroughly cleanse the groin region using chlorhexidine, which is preferred for its lasting antiseptic properties, or povidone-iodine. Once cleaned, place sterile drapes to isolate the area and maintain a sterile field.
Step 3-Aseptic Technique: Wear sterile gloves, a gown, face mask, and surgical cap to uphold strict asepsis throughout the procedure.
Step 4-Identifying the Insertion Site: Palpate the femoral artery just below the inguinal ligament and choose a point for needle insertion roughly 1 cm below and 0.5–1 cm medial to the arterial pulse. If available, use real-time ultrasound to visualize the femoral vein, enhancing accuracy and reducing complications.
Figure 2: Insertion of needle
Step 5-Local Anesthesia: If the clinical situation allows, inject 2–5 mL of 1% lidocaine into the skin and underlying tissue using a 26-gauge needle to provide local anesthesia. In emergency settings with unresponsive patients, this step may be omitted to save time.
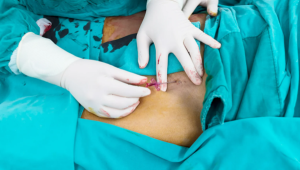
Figure 3: Femoral artery puncture
Step 6-Venous Access: A 26-gauge finder needle attached to a 5-mL syringe can be used initially to locate the vein. Alternatively, experienced practitioners may directly insert a 20–22 gauge needle connected to a 10-mL syringe. The needle should be introduced at a 45-degree angle toward the patient’s head. A flash of dark blood confirms successful venous puncture.
Step 7-Guide Wire Insertion: Once the vein is accessed, stabilize the needle and carefully introduce a J-tipped guide wire. Advance 8–10 cm of the wire into the vessel. If resistance occurs, gently rotate the wire instead of forcing it forward.
Step 8-Needle Removal: Withdraw the needle while keeping the guide wire securely in place to prevent displacement.
Step 9-Tract Dilation: Create a small incision at the entry site using a No. 11 scalpel blade. Pass the dilator over the guide wire to expand the tissue tract, allowing smoother catheter passage. Remove the dilator once the tract is dilated.
Step 10-Catheter Insertion: Advance the catheter over the guide wire until it appears at the catheter’s end. Hold the wire tip and gently guide the catheter into the vein. Once in place, remove the guide wire while ensuring the catheter remains stable.
Step 11-Securing and Verifying Placement: Fix the catheter in place using 3-0 or 4-0 nylon sutures to prevent accidental removal. Confirm placement by aspirating blood and flushing each port with saline. Optionally, use the FLUSH test by injecting agitated saline and viewing the heart with ultrasound to verify correct intravascular positioning.
Step 12-Final Dressing: Apply an antibiotic ointment to the insertion site and cover it with sterile dressing to protect against infection and maintain cleanliness.
Catheter-over-Needle Method
Step 1-Preparation: Ensure all equipment is ready and identify the femoral vein using anatomic landmarks or ultrasound if available.
Step 2-Needle-Catheter Assembly: Use a solid needle that has a short, single-lumen catheter preloaded over it.
Step 3-Vein Puncture: Insert the needle with the catheter into the skin and advance until blood return confirms entry into the femoral vein.
Step 4-Catheter Advancement: Once venous access is confirmed, advance the catheter over the needle into the vessel lumen.
Step 5-Needle Removal: Carefully withdraw the needle while leaving the catheter securely in place within the vein.
Step 6-Secure and Confirm: Secure the catheter, confirm patency, and proceed with flushing or connecting to infusion systems as needed.
Complications
Arterial puncture: Occurs more often in low-flow states or when arterial pulsations are faint, such as during circulatory arrest or in patients with iliac/femoral artery stenosis.
Pseudoaneurysm: Can form because of arterial injury.
Hematoma: Typically self-limiting, resulting from arterial or venous injury; however, in coagulopathic patients, it may extend into the retroperitoneum.
Bowel injury: More likely in those with femoral hernias; though usually self-limiting, it carries a risk of sepsis from intestinal flora.
Bladder puncture: Can happen if the bladder is distended; while often minor, it also poses a contamination risk.
Psoas abscess: Results from bacterial contamination after psoas fascia penetration.
Septic arthritis: Especially seen in infants when the hip joint capsule is inadvertently punctured.
Femoral nerve injury: May lead to paresthesia.
Infection: A common risk with any invasive procedure.
Venous thrombosis: Involves clot formation in the femoral or iliac veins.
With the rise in the use of invasive monitoring tools and aggressive fluid resuscitation strategies, the ability to quickly and accurately establish vascular access has become essential for physicians working in emergency and critical care settings.
While peripheral veins can provide a pathway to the central venous system, using them often involves threading long catheters through superficial veins, which may be difficult to locate during emergencies. In contrast, the internal jugular, subclavian, and femoral veins have consistent anatomical locations, making them more reliable options for cannulation in critically ill patients.
Each central venous access site carries the risk of complications and potential failure, often worsened by the challenging conditions under which access must be obtained. Earlier research suggested lower rates of catheter-related bloodstream infections (CRBSIs) with internal jugular or subclavian access compared to femoral access, but later studies (2008–2010) found no significant differences among the three sites.
Femoral vein cannulation is among the most frequently used techniques in emergency settings. Success with this method relies on careful patient selection, thorough anatomical knowledge, and typically employs the modified Seldinger technique.
Figure 1: Femoral artery
Femoral venous catheterization is commonly indicated in several emergency situations. It provides rapid central access for drug delivery during cardiopulmonary resuscitation (CPR) and is recommended in trauma patients, particularly when peripheral IV access is difficult or delayed. In cases of suspected superior vena cava injury, it is preferred over supraclavicular access. Additional uses include urgent hemodialysis, hemoperfusion in drug overdose, and central venous pressure monitoring. Guidelines for safe and effective central venous access have been published by organizations such as the American Society of Anesthesiologists (2012, updated 2020) and the Association of Anaesthetists of Great Britain and Ireland (2016).
Femoral central venous access is contraindicated in certain situations. Absolute contraindications include suspected or confirmed injury or thrombosis of the femoral, iliac, or inferior vena cava veins, and in patients who are ambulatory, due to the increased risk of catheter complications like fracture or migration.
Relative contraindications involve conditions that may increase procedural risk or reduce success, such as bleeding disorders (inherited or due to anticoagulant use), anatomical distortion from injury or deformity, prior long-term catheterization, inability to locate the femoral artery by palpation, a history of vasculitis, previous sclerotherapy, or prior radiation exposure in the area.
Improved Safety and Efficacy: Modern FCVA techniques now include ultrasound-guided insertion, intraprocedural tip location (via TTE, IC-ECG), and catheter tunneling, significantly reducing risks of infection, thrombosis, and malposition.
Redefinition of “Central” Access: FCVA is only considered a central access if the catheter tip is in the inferior vena cava (IVC) or right atrium; otherwise, it’s deemed “peripheral” and unsuitable for certain infusions.
Optimized Emergency vs Elective Use: Emergency FCVA (short-term, groin exit site) carries higher infection risk and is recommended to be removed within 48 hours. Elective FCVA uses protocols like SIF, with better insertion technique, mid-thigh exit site, and longer catheter lengths to reduce complications.
New Anatomical Access Points: Besides the common femoral vein, access via the superficial femoral, popliteal, and saphenous veins is now feasible using ultrasound, expanding indications.
Tunneling Techniques: Tunneling (especially to mid-thigh) reduces bacterial contamination and dislodgement, improving outcomes especially in long-term and pediatric care.
Effective Tip Location: Real-time tip location using transhepatic ultrasound, subcostal views, or intracavitary ECG enhances accuracy, making post-procedural X-rays obsolete.
Expanded Indications: FCVA is now used beyond superior vena cava obstruction—especially in palliative care, prone ventilated COVID patients, and cognitively impaired patients needing secure, low-maintenance central access.
Antiseptic solution (e.g., povidone-iodine or chlorhexidine) for skin preparation
Sterile draping materials and towels
Sterile gloves, gown, surgical mask, and cap
1% lidocaine for local anesthesia
26-gauge needle with a 2–5 mL syringe for anesthetic infiltration
Finder needle (26-gauge)
20- to 22-gauge needle with a 10 mL syringe for vascular access
J-tip guidewire
No. 11 blade scalpel
Dilator to expand skin and soft tissue at the insertion site
Central venous catheter (single or multiple lumens)
3-0 or 4-0 silk or nylon suture for securing the catheter
Locate the anatomical landmarks and disinfect the puncture site using alcohol followed by a povidone-iodine or chlorhexidine solution. Administer 2–5 mL of 1% lidocaine with a 26-gauge needle to numb the skin and underlying tissue. In emergencies involving unresponsive patients, anesthesia may be skipped to allow rapid vascular access for urgent treatment.
For femoral vein catheter insertion, position the patient lying flat on their back with the hip kept straight and aligned.
Step 1-Patient Positioning: Begin by laying the patient flat on their back (supine position), ensuring the groin area is fully exposed. Maintain the hip in a straight, neutral alignment to facilitate easy access to the femoral vein.
Step 2-Site Preparation and Draping: Thoroughly cleanse the groin region using chlorhexidine, which is preferred for its lasting antiseptic properties, or povidone-iodine. Once cleaned, place sterile drapes to isolate the area and maintain a sterile field.
Step 3-Aseptic Technique: Wear sterile gloves, a gown, face mask, and surgical cap to uphold strict asepsis throughout the procedure.
Step 4-Identifying the Insertion Site: Palpate the femoral artery just below the inguinal ligament and choose a point for needle insertion roughly 1 cm below and 0.5–1 cm medial to the arterial pulse. If available, use real-time ultrasound to visualize the femoral vein, enhancing accuracy and reducing complications.
Figure 2: Insertion of needle
Step 5-Local Anesthesia: If the clinical situation allows, inject 2–5 mL of 1% lidocaine into the skin and underlying tissue using a 26-gauge needle to provide local anesthesia. In emergency settings with unresponsive patients, this step may be omitted to save time.
Figure 3: Femoral artery puncture
Step 6-Venous Access: A 26-gauge finder needle attached to a 5-mL syringe can be used initially to locate the vein. Alternatively, experienced practitioners may directly insert a 20–22 gauge needle connected to a 10-mL syringe. The needle should be introduced at a 45-degree angle toward the patient’s head. A flash of dark blood confirms successful venous puncture.
Step 7-Guide Wire Insertion: Once the vein is accessed, stabilize the needle and carefully introduce a J-tipped guide wire. Advance 8–10 cm of the wire into the vessel. If resistance occurs, gently rotate the wire instead of forcing it forward.
Step 8-Needle Removal: Withdraw the needle while keeping the guide wire securely in place to prevent displacement.
Step 9-Tract Dilation: Create a small incision at the entry site using a No. 11 scalpel blade. Pass the dilator over the guide wire to expand the tissue tract, allowing smoother catheter passage. Remove the dilator once the tract is dilated.
Step 10-Catheter Insertion: Advance the catheter over the guide wire until it appears at the catheter’s end. Hold the wire tip and gently guide the catheter into the vein. Once in place, remove the guide wire while ensuring the catheter remains stable.
Step 11-Securing and Verifying Placement: Fix the catheter in place using 3-0 or 4-0 nylon sutures to prevent accidental removal. Confirm placement by aspirating blood and flushing each port with saline. Optionally, use the FLUSH test by injecting agitated saline and viewing the heart with ultrasound to verify correct intravascular positioning.
Step 12-Final Dressing: Apply an antibiotic ointment to the insertion site and cover it with sterile dressing to protect against infection and maintain cleanliness.
Step 1-Preparation: Ensure all equipment is ready and identify the femoral vein using anatomic landmarks or ultrasound if available.
Step 2-Needle-Catheter Assembly: Use a solid needle that has a short, single-lumen catheter preloaded over it.
Step 3-Vein Puncture: Insert the needle with the catheter into the skin and advance until blood return confirms entry into the femoral vein.
Step 4-Catheter Advancement: Once venous access is confirmed, advance the catheter over the needle into the vessel lumen.
Step 5-Needle Removal: Carefully withdraw the needle while leaving the catheter securely in place within the vein.
Step 6-Secure and Confirm: Secure the catheter, confirm patency, and proceed with flushing or connecting to infusion systems as needed.
Arterial puncture: Occurs more often in low-flow states or when arterial pulsations are faint, such as during circulatory arrest or in patients with iliac/femoral artery stenosis.
Pseudoaneurysm: Can form because of arterial injury.
Hematoma: Typically self-limiting, resulting from arterial or venous injury; however, in coagulopathic patients, it may extend into the retroperitoneum.
Bowel injury: More likely in those with femoral hernias; though usually self-limiting, it carries a risk of sepsis from intestinal flora.
Bladder puncture: Can happen if the bladder is distended; while often minor, it also poses a contamination risk.
Psoas abscess: Results from bacterial contamination after psoas fascia penetration.
Septic arthritis: Especially seen in infants when the hip joint capsule is inadvertently punctured.
Femoral nerve injury: May lead to paresthesia.
Infection: A common risk with any invasive procedure.
Venous thrombosis: Involves clot formation in the femoral or iliac veins.
Both our subscription plans include Free CME/CPD AMA PRA Category 1 credits.
Digital Certificate PDF
On course completion, you will receive a full-sized presentation quality digital certificate.
medtigo Simulation
A dynamic medical simulation platform designed to train healthcare professionals and students to effectively run code situations through an immersive hands-on experience in a live, interactive 3D environment.
medtigo Points
medtigo points is our unique point redemption system created to award users for interacting on our site. These points can be redeemed for special discounts on the medtigo marketplace as well as towards the membership cost itself.
Community Forum post/reply = 5 points
*Redemption of points can occur only through the medtigo marketplace, courses, or simulation system. Money will not be credited to your bank account. 10 points = $1.
All Your Certificates in One Place
When you have your licenses, certificates and CMEs in one place, it's easier to track your career growth. You can easily share these with hospitals as well, using your medtigo app.