Different imaging procedures can be performed to assess individuals who have suspected urinary tract or renal disease. For direct viewing of the renal vasculature, renal angiography is a gold standard procedure. It is important to detect and treat the renal vein thrombosis and renal artery stenosis. Plain abdominal film is not used nowadays to check the urinary tract and kidney disease. Renal ultrasonography is used to screen the hydronephrosis or urinary tract dilation. Ultrasonography is used to evaluate the genetic or acquired polycystic kidney disease. Color doppler ultrasonography is used to check the velocity or flow of the blood in major renal artery. It is used to diagnose the renal vascular occlusive disease.
Plain abdominal films are used to evaluate the radiopaque kidney stone like calcium containing stone, cysteine or struvite. It can be performed on the pregnant women and pediatric patient as it emits low radiation.
Intravenous pyelography (IVP) is used to detect the kidney stone and determine the level of blockage in the patient who has urinary tract blockage.
Computed tomography (CT) is used to check the mass, kidney injury, pyelonephritis and stone. CT scan is preferred over the ultrasonography to identify the renal cysts because it can detect the 2 to 3 diameter small cysts.
Magnetic resonance imaging (MRI) is used as an alternative procedure to CT scan who has toxicity from the intravenous (IV) contrast.
Radionuclide scanning is used to check the renal perfusion in thrombosis and renal artery stenosis. Radionuclide cystography is used to detect the vesicoureteral reflux in pediatric.
Retrograde pyelography is used to localize the area of urinary tract blockage. Diuretic renography is used to differentiate between the anatomic and functional blockage after the dilation of upper urinary tract.
X-ray image of kidney stone
X-ray image of uterus
Indications
Kidney stones: To detect the size, presence and the location of the radiopaque kidney, ureteral, or bladder stone which causes urinary obstruction and pain.
Abdominal pain: Abdominal pain assessment to rule out urinary or gastrointestinal issues.
Urinary tract obstruction and infection: To identify the urinary tract blockage and the recurrent UTI or any unexplained urinary symptom. Investigation of probable hydronephrosis or ureteral obstruction.
Kidney disease: To assess the shape, size, structure of the kidney and detect the diseases like polycystic kidney disease and chronic kidney disease.
Cysts and tumor: To detect he abnormality or mass in the bladder or kidney.
Abnormality in bladder: To evaluate the bladder stone, thickness of wall and tumor which can indicate cancer or infection.
Urinary devices: Monitoring urinary devices such as catheters, stents, and nephrostomy tubes. Preoperative imaging for surgery on the urinary tract or abdomen.
Bowel Gas Pattern: Detection of aberrant gas distribution, indicating ileus or intestinal blockage.
Contraindications
Pregnancy: KUB imaging exposes the developing fetus to harmful ionizing radiation, so non-radiological methods like ultrasound or MRI should be considered if pregnancy is suspected.
Allergy: Contrast materials may be used in KUB procedures, causing reactions like rash, anaphylaxis, or renal issues in patients with known allergies to iodine-based contrast agents, necessitating pre-screening.
Infection: Severe infections like urinary tract infections might confuse imaging interpretation and worsen the patient’s health as a result of radiation exposure.
Obesity: Severe obesity may reduce the efficiency of KUB imaging because of abdominal tissue thickness, indicating that alternate modalities like CT or MRI may be more appropriate.
Outcomes
Equipment
Plain Films of the Abdomen: X-ray machine, X-ray tube, image receptor, and control console for image production.
Renal Ultrasonography: High-frequency sound waves to create images of kidneys and surrounding structures.
Intravenous Pyelography (IVP): X-ray machine, X-ray tube, contrast injector, image receptor, and control console.
Computed Tomography (CT): A rotating X-ray tube and detectors to capture cross-sectional images of kidneys and surrounding structures.
Magnetic Resonance Imaging (MRI): powerful magnets and radio waves to create detailed images of kidneys and surrounding structures.
Diuretic Renography: gamma camera, radioactive tracers, computer workstation, and monitor for dynamic study.
Patient preparation
Medical history: Medical history includes renal or urine difficulties, operations, and imaging-related diseases. KUB imaging uses ionizing radiation, thus it is important to know about pregnancy status. If contrast materials or other imaging methods are used, patients with allergies should be informed.
Clothing and jewellery removal: To reduce interference with X-ray imaging, patients should remove clothing below the waist and wear a hospital gown. Jewellery and metallic objects should also be removed.
Bladder preparation: Request a full or empty bladder for better visibility.
Diet and medication: No dietary restrictions are required for KUB imaging. Patients should advise the technologist if they are taking any drugs that may impact kidney function or receiving contrast material.
Patient position
The patient will lie on the X-ray table, usually in a supine position for a standard KUB X-ray, with lateral or oblique views possible at different angles. They will be instructed to remain still to avoid motion artifacts that decrease the clarity of the X-ray images.
Plain Films of the Abdomen
Step 1: Patient preparation
Inquire about patient’s medical history and recent symptoms. Ask about pregnancy status for safe radiation use. Remove jewellery, clothing, and metallic items to prevent interference. Change into a hospital gown and explain the procedure to reduce anxiety.
Step 2: Positioning the Patient
Patient lies in a supine position on the X-ray table. Patient’s body is aligned and centered on the table. Patient’s legs are extended, arms at their sides.
Step 3: Equipment setup
Place image receptor behind the patient’s abdomen. Position X-ray tube above or below the patient. Set exposure parameters based on patient’s size and clinical indication.
Step 4: Central Ray Alignment
Central ray directed at the patient’s mid-abdomen. Adjust X-ray beam’s collimation to limit radiation exposure.
Step 5: Take X-ray
Patient holds breath during exposure to reduce motion. X-ray tube emits radiation, passing through the patient’s body. No movement occurs during exposure to prevent image blurring.
Step 4: Evaluating the image quality
Review image for clarity, iliac crests included motion artifacts, contrast and artifacts. If unsatisfactory, repeat exposure, adjust position or settings.
Renal Ultrasonography
Step 1: Patient preparation
Explain the procedure, instruct the patient to wear loose clothing or change into a hospital gown. The patient should lie on an examination table in a supine position or prone position for better visualization. Fasting may be required for some patients to avoid bowel gas interference. Drinking water before the exam to fill the bladder.
Step 2: Equipment setup
Ensure the ultrasound machine is set up and functioning properly. Select an appropriate ultrasound transducer. Apply a generous amount of ultrasound gel to the patient’s abdomen to eliminate air between the transducer and the skin.
Step 3: Scan the kidney
Systematically scan the kidney from top to bottom. After completing the right kidney, move to the left kidney. Ensure the entire kidney is visualized in both longitudinal and transverse planes.
Step 4: Events the urinary tract
Bladder Assessment: If indicated, fill the bladder. In some cases, the ureters can be visualized.
Additional Views and Imaging: If kidneys are difficult to visualize due to bowel gas, the patient may be asked to roll into a prone position. Hydronephrosis assessment should focus on renal pelvis and ureters. Doppler ultrasound may be used to assess kidney blood flow.
Step 5: Completion
Clean the patient, send the images for review, and provide the patient with any follow-up instructions.
Intravenous Pyelography
Step 1: Patient preparation
Before the procedure, fasting and empty the bladder is necessary. Consider mild laxatives. Explain the procedure, note allergies, comorbidities, previous illnesses, and drug history. Ask the patient to remove metal objects and ensure they are not pregnant. If pregnant, take precautions to protect the fetus from radiation exposure. Ensure the patient is not pregnant and remove jewellery and metal objects before the procedure.
Step 2: Position of patient
Position the patient in a supine position for imaging.
Step 3: Initial imaging
Initial imaging involves obtaining preliminary radiographs, including a Kidney-Ureter-Bladder (KUB) X-ray, to assess the area from the suprarenal region to below the pubic symphysis.
Step 4: Calcifications Calcifications should be noted before contrast administration to avoid missed diagnoses. Calcifications should be examined for stones or other important findings.
Step 5: Oblique Radiographs
Oblique radiographs are obtained to confirm the position and nature of any calcifications.
Step 6: Contrast Injection Contrast Injection is administered to visualize the urinary tract and adjust imaging based on early findings.
Step 7: Nephrographic images Nephrographic images are taken after 1 to 3 minutes, capturing the kidneys and upper urinary tract. Another KUB radiograph is obtained 5 minutes after contrast administration to assess the kidneys, ureters, and bladder. Abdominal compression is applied to aid in better visualization of the urinary tract.
Step 8: Pyelographic images
Pyelographic images are taken after 5 minutes of compression to observe bladder filling and check for potential blockages or abnormalities. After compression, a KUB radiograph and fluoroscopic spot images of the ureters are captured.
Step 9: Radiographic image
A radiographic image of the bladder is obtained to assess filling and function after contrast excretion.
CT scan
Step 1: Patient preparation
Ensure patient is not allergic to contrast agents, has renal failure, or is not pregnant. Encourage patient to empty their bladder before the procedure. Hydrate patient before the procedure to reduce contrast-induced nephropathy risk. Step 2: Contrast Agent
Administer intravenous saline or 10 mg of intravenous furosemide to enhance opacification and distend the collecting system.
Step 3: Patient Position
Position patient on the CT scanner table in supine or prone position. Step 4: Precontract Phase
Perform baseline imaging to identify any calcifications, stones, or space-occupying lesions. Step 5: Contrast Injection
Inject an intravenous contrast agent, monitor for allergic reactions or side effects. Step 6: Capture image at different phase
Capture images that visualize renal vasculature within 70 seconds.
Nephrographic Phase: Differentiate renal masses from simple cysts.
Excretory Phase: Capture images of the urinary system at 5 minutes after contrast injection. Step 7: Post-Procedure
Remove IV, monitor injection site for complications, and encourage for fluid intake.
Magnetic Resonance Imaging (MRI)
MRI machine
Step 1: Patient preparation
Check for allergies to contrast agents, especially gadolinium. Ensure no contraindicated metallic implants or pacemakers. MRI is generally safe in pregnancy but is usually avoided in the first trimester unless absolutely necessary. Explain the procedure to the patient, emphasizing the need to remain still during the scan. Patient should empty their bladder before the procedure. Patients should remove all metallic items to avoid interference with the MRI process.
Step 2: Positioning the Patient
Patient should be positioned lying on their back on the MRI table.
Step 3: Contrast Administration
Initial non-contrast scan to visualize baseline conditions. Gadolinium-based contrast may be administered to enhance imaging of blood vessels, kidneys, and urinary structures. Watch for signs of allergic reactions to the contrast. Timing of the MRI scan depends on the clinical indications.
Step 4: Imaging Sequence
T1-weighted imaging, T2-weighted imaging, contrast-Enhanced imaging, and post-contrast imaging are taken.
Step 5: Post-Procedure Care
Removal of IV Access and fluids are encouraged for patients.
Diuretic Renography
Step 1: Patient Preparation
Check for allergies to radiopharmaceuticals and diuretics and confirm if the patient is pregnant. Ensure the patient drinks fluids for better renal perfusion. Patient should empty bladder to avoid imaging distortion. Review and adjust medications, particularly those affecting renal function.
Step 2: Administration of Radiopharmaceutical
Injection of Radiopharmaceutical: Inject a radiotracer (e.g., Technetium-99m DTPA) intravenously to assess kidney function. Begin imaging immediately after injection for optimal results.
Step 3: Diuretic Administration
Furosemide Injection: Administer intravenously to promote urine production and help assess kidney drainage and obstruction.
Step 4: Imaging Acquisition
Initial Dynamic Imaging: Capture images as the radiotracer circulates in the kidneys to assess perfusion and clearance.
Post-Diuretic Imaging: Take additional images after furosemide administration to track tracer movement and assess kidney response.
Delayed Imaging: Perform delayed imaging to check for obstructions or hydronephrosis.
Step 5: Image Analysis
Evaluate renal perfusion, function, and drainage. Assess for obstructions or hydronephrosis and determine renal clearance efficiency.
Step 6: Post-Procedure Care
Remove the IV line after the procedure. Encourage fluid intake to flush out the radiopharmaceutical. Watch for any allergic reactions to the diuretic or radiopharmaceutical.
Step 7: Follow-Up
The radiologist will compile results for the referring physician. Additional tests like CT, MRI, or ultrasound may be recommended if further pathology is suspected.
Complications
Intravenous Pyelography (IVP): Potential for contrast reactions, kidney injury, radiation exposure, and infection.
Renal Ultrasonography: May cause discomfort, overhydration, and difficulty in visualizing due to obesity, bowel gas, or severe renal dysfunction.
Computed Tomography (CT): Increases cancer risk, causing adverse reactions to contrast agents.
Magnetic Resonance Imaging (MRI): Allergic reactions to gadolinium-based contrast agents can cause skin rashes, itching, or severe anaphylactic reactions.
Radionuclide Scanning: Exposure to radiation, potentially leading to adverse reactions and renal dysfunction.
Renal Angiography: Risk of bleeding, infection, and contrast reactions.
Diuretic Renography: Potential for allergic reactions, contrast-related complications, dehydration, and electrolyte imbalances.
»
Home » Procedure » Kidneys, Ureters, and Bladder (KUB) Imaging
Kidneys, Ureters, and Bladder (KUB) Imaging
Updated :
December 18, 2025
Different imaging procedures can be performed to assess individuals who have suspected urinary tract or renal disease. For direct viewing of the renal vasculature, renal angiography is a gold standard procedure. It is important to detect and treat the renal vein thrombosis and renal artery stenosis. Plain abdominal film is not used nowadays to check the urinary tract and kidney disease. Renal ultrasonography is used to screen the hydronephrosis or urinary tract dilation. Ultrasonography is used to evaluate the genetic or acquired polycystic kidney disease. Color doppler ultrasonography is used to check the velocity or flow of the blood in major renal artery. It is used to diagnose the renal vascular occlusive disease.
Plain abdominal films are used to evaluate the radiopaque kidney stone like calcium containing stone, cysteine or struvite. It can be performed on the pregnant women and pediatric patient as it emits low radiation.
Intravenous pyelography (IVP) is used to detect the kidney stone and determine the level of blockage in the patient who has urinary tract blockage.
Computed tomography (CT) is used to check the mass, kidney injury, pyelonephritis and stone. CT scan is preferred over the ultrasonography to identify the renal cysts because it can detect the 2 to 3 diameter small cysts.
Magnetic resonance imaging (MRI) is used as an alternative procedure to CT scan who has toxicity from the intravenous (IV) contrast.
Radionuclide scanning is used to check the renal perfusion in thrombosis and renal artery stenosis. Radionuclide cystography is used to detect the vesicoureteral reflux in pediatric.
Retrograde pyelography is used to localize the area of urinary tract blockage. Diuretic renography is used to differentiate between the anatomic and functional blockage after the dilation of upper urinary tract.
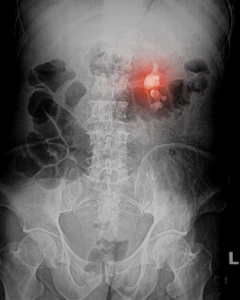
X-ray image of kidney stone
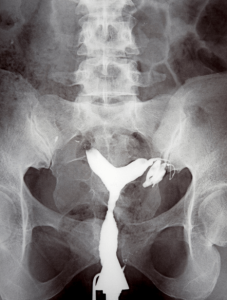
X-ray image of uterus
Kidney stones: To detect the size, presence and the location of the radiopaque kidney, ureteral, or bladder stone which causes urinary obstruction and pain.
Abdominal pain: Abdominal pain assessment to rule out urinary or gastrointestinal issues.
Urinary tract obstruction and infection: To identify the urinary tract blockage and the recurrent UTI or any unexplained urinary symptom. Investigation of probable hydronephrosis or ureteral obstruction.
Kidney disease: To assess the shape, size, structure of the kidney and detect the diseases like polycystic kidney disease and chronic kidney disease.
Cysts and tumor: To detect he abnormality or mass in the bladder or kidney.
Abnormality in bladder: To evaluate the bladder stone, thickness of wall and tumor which can indicate cancer or infection.
Urinary devices: Monitoring urinary devices such as catheters, stents, and nephrostomy tubes. Preoperative imaging for surgery on the urinary tract or abdomen.
Bowel Gas Pattern: Detection of aberrant gas distribution, indicating ileus or intestinal blockage.
Pregnancy: KUB imaging exposes the developing fetus to harmful ionizing radiation, so non-radiological methods like ultrasound or MRI should be considered if pregnancy is suspected.
Allergy: Contrast materials may be used in KUB procedures, causing reactions like rash, anaphylaxis, or renal issues in patients with known allergies to iodine-based contrast agents, necessitating pre-screening.
Infection: Severe infections like urinary tract infections might confuse imaging interpretation and worsen the patient’s health as a result of radiation exposure.
Obesity: Severe obesity may reduce the efficiency of KUB imaging because of abdominal tissue thickness, indicating that alternate modalities like CT or MRI may be more appropriate.
Plain Films of the Abdomen: X-ray machine, X-ray tube, image receptor, and control console for image production.
Renal Ultrasonography: High-frequency sound waves to create images of kidneys and surrounding structures.
Intravenous Pyelography (IVP): X-ray machine, X-ray tube, contrast injector, image receptor, and control console.
Computed Tomography (CT): A rotating X-ray tube and detectors to capture cross-sectional images of kidneys and surrounding structures.
Magnetic Resonance Imaging (MRI): powerful magnets and radio waves to create detailed images of kidneys and surrounding structures.
Diuretic Renography: gamma camera, radioactive tracers, computer workstation, and monitor for dynamic study.
Patient preparation
Medical history: Medical history includes renal or urine difficulties, operations, and imaging-related diseases. KUB imaging uses ionizing radiation, thus it is important to know about pregnancy status. If contrast materials or other imaging methods are used, patients with allergies should be informed.
Clothing and jewellery removal: To reduce interference with X-ray imaging, patients should remove clothing below the waist and wear a hospital gown. Jewellery and metallic objects should also be removed.
Bladder preparation: Request a full or empty bladder for better visibility.
Diet and medication: No dietary restrictions are required for KUB imaging. Patients should advise the technologist if they are taking any drugs that may impact kidney function or receiving contrast material.
Patient position
The patient will lie on the X-ray table, usually in a supine position for a standard KUB X-ray, with lateral or oblique views possible at different angles. They will be instructed to remain still to avoid motion artifacts that decrease the clarity of the X-ray images.
Step 1: Patient preparation
Inquire about patient’s medical history and recent symptoms. Ask about pregnancy status for safe radiation use. Remove jewellery, clothing, and metallic items to prevent interference. Change into a hospital gown and explain the procedure to reduce anxiety.
Step 2: Positioning the Patient
Patient lies in a supine position on the X-ray table. Patient’s body is aligned and centered on the table. Patient’s legs are extended, arms at their sides.
Step 3: Equipment setup
Place image receptor behind the patient’s abdomen. Position X-ray tube above or below the patient. Set exposure parameters based on patient’s size and clinical indication.
Step 4: Central Ray Alignment
Central ray directed at the patient’s mid-abdomen. Adjust X-ray beam’s collimation to limit radiation exposure.
Step 5: Take X-ray
Patient holds breath during exposure to reduce motion. X-ray tube emits radiation, passing through the patient’s body. No movement occurs during exposure to prevent image blurring.
Step 4: Evaluating the image quality
Review image for clarity, iliac crests included motion artifacts, contrast and artifacts. If unsatisfactory, repeat exposure, adjust position or settings.
Step 1: Patient preparation
Explain the procedure, instruct the patient to wear loose clothing or change into a hospital gown. The patient should lie on an examination table in a supine position or prone position for better visualization. Fasting may be required for some patients to avoid bowel gas interference. Drinking water before the exam to fill the bladder.
Step 2: Equipment setup
Ensure the ultrasound machine is set up and functioning properly. Select an appropriate ultrasound transducer. Apply a generous amount of ultrasound gel to the patient’s abdomen to eliminate air between the transducer and the skin.
Step 3: Scan the kidney
Systematically scan the kidney from top to bottom. After completing the right kidney, move to the left kidney. Ensure the entire kidney is visualized in both longitudinal and transverse planes.
Step 4: Events the urinary tract
Bladder Assessment: If indicated, fill the bladder. In some cases, the ureters can be visualized.
Additional Views and Imaging: If kidneys are difficult to visualize due to bowel gas, the patient may be asked to roll into a prone position. Hydronephrosis assessment should focus on renal pelvis and ureters. Doppler ultrasound may be used to assess kidney blood flow.
Step 5: Completion
Clean the patient, send the images for review, and provide the patient with any follow-up instructions.
Step 1: Patient preparation
Before the procedure, fasting and empty the bladder is necessary. Consider mild laxatives. Explain the procedure, note allergies, comorbidities, previous illnesses, and drug history. Ask the patient to remove metal objects and ensure they are not pregnant. If pregnant, take precautions to protect the fetus from radiation exposure. Ensure the patient is not pregnant and remove jewellery and metal objects before the procedure.
Step 2: Position of patient
Position the patient in a supine position for imaging.
Step 3: Initial imaging
Initial imaging involves obtaining preliminary radiographs, including a Kidney-Ureter-Bladder (KUB) X-ray, to assess the area from the suprarenal region to below the pubic symphysis.
Step 4: Calcifications Calcifications should be noted before contrast administration to avoid missed diagnoses. Calcifications should be examined for stones or other important findings.
Step 5: Oblique Radiographs
Oblique radiographs are obtained to confirm the position and nature of any calcifications.
Step 6: Contrast Injection Contrast Injection is administered to visualize the urinary tract and adjust imaging based on early findings.
Step 7: Nephrographic images Nephrographic images are taken after 1 to 3 minutes, capturing the kidneys and upper urinary tract. Another KUB radiograph is obtained 5 minutes after contrast administration to assess the kidneys, ureters, and bladder. Abdominal compression is applied to aid in better visualization of the urinary tract.
Step 8: Pyelographic images
Pyelographic images are taken after 5 minutes of compression to observe bladder filling and check for potential blockages or abnormalities. After compression, a KUB radiograph and fluoroscopic spot images of the ureters are captured.
Step 9: Radiographic image
A radiographic image of the bladder is obtained to assess filling and function after contrast excretion.
Step 1: Patient preparation
Ensure patient is not allergic to contrast agents, has renal failure, or is not pregnant. Encourage patient to empty their bladder before the procedure. Hydrate patient before the procedure to reduce contrast-induced nephropathy risk. Step 2: Contrast Agent
Administer intravenous saline or 10 mg of intravenous furosemide to enhance opacification and distend the collecting system.
Step 3: Patient Position
Position patient on the CT scanner table in supine or prone position. Step 4: Precontract Phase
Perform baseline imaging to identify any calcifications, stones, or space-occupying lesions. Step 5: Contrast Injection
Inject an intravenous contrast agent, monitor for allergic reactions or side effects. Step 6: Capture image at different phase
Capture images that visualize renal vasculature within 70 seconds.
Nephrographic Phase: Differentiate renal masses from simple cysts.
Excretory Phase: Capture images of the urinary system at 5 minutes after contrast injection. Step 7: Post-Procedure
Remove IV, monitor injection site for complications, and encourage for fluid intake.
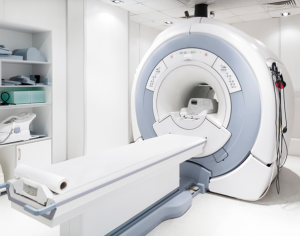
MRI machine
Step 1: Patient preparation
Check for allergies to contrast agents, especially gadolinium. Ensure no contraindicated metallic implants or pacemakers. MRI is generally safe in pregnancy but is usually avoided in the first trimester unless absolutely necessary. Explain the procedure to the patient, emphasizing the need to remain still during the scan. Patient should empty their bladder before the procedure. Patients should remove all metallic items to avoid interference with the MRI process.
Step 2: Positioning the Patient
Patient should be positioned lying on their back on the MRI table.
Step 3: Contrast Administration
Initial non-contrast scan to visualize baseline conditions. Gadolinium-based contrast may be administered to enhance imaging of blood vessels, kidneys, and urinary structures. Watch for signs of allergic reactions to the contrast. Timing of the MRI scan depends on the clinical indications.
Step 4: Imaging Sequence
T1-weighted imaging, T2-weighted imaging, contrast-Enhanced imaging, and post-contrast imaging are taken.
Step 5: Post-Procedure Care
Removal of IV Access and fluids are encouraged for patients.
Step 1: Patient Preparation
Check for allergies to radiopharmaceuticals and diuretics and confirm if the patient is pregnant. Ensure the patient drinks fluids for better renal perfusion. Patient should empty bladder to avoid imaging distortion. Review and adjust medications, particularly those affecting renal function.
Step 2: Administration of Radiopharmaceutical
Injection of Radiopharmaceutical: Inject a radiotracer (e.g., Technetium-99m DTPA) intravenously to assess kidney function. Begin imaging immediately after injection for optimal results.
Step 3: Diuretic Administration
Furosemide Injection: Administer intravenously to promote urine production and help assess kidney drainage and obstruction.
Step 4: Imaging Acquisition
Initial Dynamic Imaging: Capture images as the radiotracer circulates in the kidneys to assess perfusion and clearance.
Post-Diuretic Imaging: Take additional images after furosemide administration to track tracer movement and assess kidney response.
Delayed Imaging: Perform delayed imaging to check for obstructions or hydronephrosis.
Step 5: Image Analysis
Evaluate renal perfusion, function, and drainage. Assess for obstructions or hydronephrosis and determine renal clearance efficiency.
Step 6: Post-Procedure Care
Remove the IV line after the procedure. Encourage fluid intake to flush out the radiopharmaceutical. Watch for any allergic reactions to the diuretic or radiopharmaceutical.
Step 7: Follow-Up
The radiologist will compile results for the referring physician. Additional tests like CT, MRI, or ultrasound may be recommended if further pathology is suspected.
Complications
Intravenous Pyelography (IVP): Potential for contrast reactions, kidney injury, radiation exposure, and infection.
Renal Ultrasonography: May cause discomfort, overhydration, and difficulty in visualizing due to obesity, bowel gas, or severe renal dysfunction.
Computed Tomography (CT): Increases cancer risk, causing adverse reactions to contrast agents.
Magnetic Resonance Imaging (MRI): Allergic reactions to gadolinium-based contrast agents can cause skin rashes, itching, or severe anaphylactic reactions.
Radionuclide Scanning: Exposure to radiation, potentially leading to adverse reactions and renal dysfunction.
Renal Angiography: Risk of bleeding, infection, and contrast reactions.
Diuretic Renography: Potential for allergic reactions, contrast-related complications, dehydration, and electrolyte imbalances.
Both our subscription plans include Free CME/CPD AMA PRA Category 1 credits.
Digital Certificate PDF
On course completion, you will receive a full-sized presentation quality digital certificate.
medtigo Simulation
A dynamic medical simulation platform designed to train healthcare professionals and students to effectively run code situations through an immersive hands-on experience in a live, interactive 3D environment.
medtigo Points
medtigo points is our unique point redemption system created to award users for interacting on our site. These points can be redeemed for special discounts on the medtigo marketplace as well as towards the membership cost itself.
Community Forum post/reply = 5 points
*Redemption of points can occur only through the medtigo marketplace, courses, or simulation system. Money will not be credited to your bank account. 10 points = $1.
All Your Certificates in One Place
When you have your licenses, certificates and CMEs in one place, it's easier to track your career growth. You can easily share these with hospitals as well, using your medtigo app.