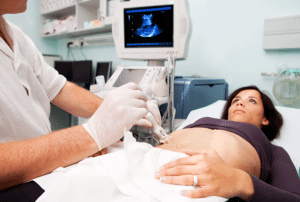
Liver ultrasonography, also called liver ultrasound, uses ultrasonic waves to pass through liver tissue to visualize its structure and functions. Sonography is another modality that involves the use of high-frequency sound waves to visualize the liver and the surrounding tissues for the diagnosis and follow-up of different liver diseases.
Liver ultrasonography
Indications
Evaluation of Abnormal Liver Function Tests (LFTs): when a patient has complaints of liver disorders, high liver enzymes, bilirubin, or if there are any other unexpected changes in the blood tests.
Assessment of Liver Size and Texture: For confirmation of hepatomegaly, confirmation of cirrhosis, or fatty liver disease, also known as steatosis.
Detection of Liver Masses: To clarify the nature of liver lesions for example: tumors, cysts, hemangiomas, or other diseases.
Monitoring Chronic Liver Disease: For patients who already have liver diseases like hepatitis B or C or the worsening or development of complications such as hepatocellular carcinoma.
Pre-Operative Assessment: To assess the liver in patients who are undergoing surgery, more specifically in patients who are prospective candidates for liver transplant surgery.
Assessment of Trauma: As a routine assessment in any patient who has presented with an injury to the abdominal area.
Screening in High-Risk Patients: As a routine health screen in patient who have risk factors like obesity, diabetes, or family history of the liver disease.
Contraindications
Severe Obesity: Obesity is one of the factors that may hamper the ultrasound waves and hence straining the chances of taking clear images of the liver.
Excessive Bowel Gas: Gas in the intestines can block the ultrasound waves and may hide the liver, making the images less clear.
Open Wounds or Infections: It is advisable to postpone the procedure particularly when the area that requires applications of the transducer is infected with sores or skins infection.
Uncooperative Patients: Patients who cannot remain still or follow instructions may make it difficult to obtain accurate images.
Outcomes
Equipment
Standard Ultrasound Machines
B-mode (Brightness mode)
Doppler Ultrasound
Portable Ultrasound Machines
Elastography Machines:
Transient Elastography (TE)
Shear Wave Elastography (SWE)
3D/4D Ultrasound Machines
Patient Preparation
Fasting: The patient is usually advised to fast for about half a day, 6-8 hours before the procedure. This assists in decreasing the volume of gas in the areas of the intestines that hinder visualization of the liver.
Medication: If any patient is taking any medication they should disclose to their physician. In most of the cases, the ordinary prescription drugs can be taken but the exact details shall be communicated by the doctor.
Clothing: Patients are advised to come for the appointment in lose fitting dresses to prepare for a physical examination. It may be required to wear a gown during the procedure depending on the type of operation.
Avoid Certain Foods: Usually there are some instructions given, including the patient should not consume fatty or dairy products a day, since they can impede visualization on the monitor.
Patient position
The preferred position is supine.
Left Lateral Decubitus Position: Where a better view of the left lobe of the liver is required, the patient can be slightly rolled to the left side.
Technique
Step 1: Positioning:
The patient is typically placed in a supine position on the examining table. Sometimes, the patient will be asked to turn to their side or sit up to obtain other views.
Step 2: Applying Gel:
A water-based gel will be applied to the abdomen. This gel eradicates air pockets between the skin and the ultrasound transducer, the probe, allowing more explicit transmission of sound waves.
Step 3: Using the Transducer:
The sonographer or radiologist will move the transducer to send high-frequency sound waves into the body. When these sound waves hit the liver and other structures, they bounce off and then are sent back to the transducer.
The transducer will be moved over different areas of the abdomen to obtain different views of the liver.
Step 4: Image Capture:
These are then converted into images, which are real-time and are displayed on a monitor; the sonographer takes these images from various angles and positions to represent an overview of the liver.
Specifically, measurements and observations are done for size, shape, texture and any irregularities such as cysts, tumours or fatty deposits.
Step 5: Analysis
Liver Size and Shape:
Assessment for enlargement, hepatomegaly, or any irregularity of the contour of the liver.
Liver Texture:
Identification of any changes in the echotexture of the liver, which can suggest cirrhosis, fatty liver, or hepatic fibrosis.
Lesion Detection:
Any mass, cyst, or tumor in the liver is identified. Blood flow within the liver may be evaluated with Doppler ultrasound to identify any vascular abnormalities.
Examination of Surrounding Structures
The sonographer examines the surrounding organs, including the gallbladder and bile ducts, pancreas, and blood vessels, for any associated diseases.
Step 6: Post-Procedure:
Preparing the Report
The sonographer collects the images and preliminary reports.
Images taken are then reviewed by a radiologist, after which a detailed report is compiled and sent to the referring physician.
Follow-Up:
The physician may order tests, treatment, or follow-up imaging based on the findings.
Complications
Discomfort or Pain: The ultrasound procedure is relatively painless. However, some patients may feel slight discomfort, especially when the technician apply a little pressure on the skin to ensure the transducer is well applied.
Allergic Reactions: Occasionally, the patient has an allergic reaction to the gel that one uses during the ultrasound.
Infection: Usually, there is very low risk of infection though if the skin is broken or the strict sterile procedures are not observed.
Inaccurate Results: As a result, factors like obesity, excessive production of bowel gases, and patient’s inability to hold their breath directly interfere with the quality of the images generated.
Liver ultrasonography, also called liver ultrasound, uses ultrasonic waves to pass through liver tissue to visualize its structure and functions. Sonography is another modality that involves the use of high-frequency sound waves to visualize the liver and the surrounding tissues for the diagnosis and follow-up of different liver diseases.
Liver ultrasonography
Evaluation of Abnormal Liver Function Tests (LFTs): when a patient has complaints of liver disorders, high liver enzymes, bilirubin, or if there are any other unexpected changes in the blood tests.
Assessment of Liver Size and Texture: For confirmation of hepatomegaly, confirmation of cirrhosis, or fatty liver disease, also known as steatosis.
Detection of Liver Masses: To clarify the nature of liver lesions for example: tumors, cysts, hemangiomas, or other diseases.
Monitoring Chronic Liver Disease: For patients who already have liver diseases like hepatitis B or C or the worsening or development of complications such as hepatocellular carcinoma.
Pre-Operative Assessment: To assess the liver in patients who are undergoing surgery, more specifically in patients who are prospective candidates for liver transplant surgery.
Assessment of Trauma: As a routine assessment in any patient who has presented with an injury to the abdominal area.
Screening in High-Risk Patients: As a routine health screen in patient who have risk factors like obesity, diabetes, or family history of the liver disease.
Severe Obesity: Obesity is one of the factors that may hamper the ultrasound waves and hence straining the chances of taking clear images of the liver.
Excessive Bowel Gas: Gas in the intestines can block the ultrasound waves and may hide the liver, making the images less clear.
Open Wounds or Infections: It is advisable to postpone the procedure particularly when the area that requires applications of the transducer is infected with sores or skins infection.
Uncooperative Patients: Patients who cannot remain still or follow instructions may make it difficult to obtain accurate images.
Standard Ultrasound Machines
B-mode (Brightness mode)
Doppler Ultrasound
Portable Ultrasound Machines
Elastography Machines:
Transient Elastography (TE)
Shear Wave Elastography (SWE)
3D/4D Ultrasound Machines
Fasting: The patient is usually advised to fast for about half a day, 6-8 hours before the procedure. This assists in decreasing the volume of gas in the areas of the intestines that hinder visualization of the liver.
Medication: If any patient is taking any medication they should disclose to their physician. In most of the cases, the ordinary prescription drugs can be taken but the exact details shall be communicated by the doctor.
Clothing: Patients are advised to come for the appointment in lose fitting dresses to prepare for a physical examination. It may be required to wear a gown during the procedure depending on the type of operation.
Avoid Certain Foods: Usually there are some instructions given, including the patient should not consume fatty or dairy products a day, since they can impede visualization on the monitor.
The preferred position is supine.
Left Lateral Decubitus Position: Where a better view of the left lobe of the liver is required, the patient can be slightly rolled to the left side.
Step 1: Positioning:
The patient is typically placed in a supine position on the examining table. Sometimes, the patient will be asked to turn to their side or sit up to obtain other views.
Step 2: Applying Gel:
A water-based gel will be applied to the abdomen. This gel eradicates air pockets between the skin and the ultrasound transducer, the probe, allowing more explicit transmission of sound waves.
Step 3: Using the Transducer:
The sonographer or radiologist will move the transducer to send high-frequency sound waves into the body. When these sound waves hit the liver and other structures, they bounce off and then are sent back to the transducer.
The transducer will be moved over different areas of the abdomen to obtain different views of the liver.
Step 4: Image Capture:
These are then converted into images, which are real-time and are displayed on a monitor; the sonographer takes these images from various angles and positions to represent an overview of the liver.
Specifically, measurements and observations are done for size, shape, texture and any irregularities such as cysts, tumours or fatty deposits.
Step 5: Analysis
Liver Size and Shape:
Assessment for enlargement, hepatomegaly, or any irregularity of the contour of the liver.
Liver Texture:
Identification of any changes in the echotexture of the liver, which can suggest cirrhosis, fatty liver, or hepatic fibrosis.
Lesion Detection:
Any mass, cyst, or tumor in the liver is identified. Blood flow within the liver may be evaluated with Doppler ultrasound to identify any vascular abnormalities.
Examination of Surrounding Structures
The sonographer examines the surrounding organs, including the gallbladder and bile ducts, pancreas, and blood vessels, for any associated diseases.
Step 6: Post-Procedure:
Preparing the Report
The sonographer collects the images and preliminary reports.
Images taken are then reviewed by a radiologist, after which a detailed report is compiled and sent to the referring physician.
Follow-Up:
The physician may order tests, treatment, or follow-up imaging based on the findings.
Complications
Discomfort or Pain: The ultrasound procedure is relatively painless. However, some patients may feel slight discomfort, especially when the technician apply a little pressure on the skin to ensure the transducer is well applied.
Allergic Reactions: Occasionally, the patient has an allergic reaction to the gel that one uses during the ultrasound.
Infection: Usually, there is very low risk of infection though if the skin is broken or the strict sterile procedures are not observed.
Inaccurate Results: As a result, factors like obesity, excessive production of bowel gases, and patient’s inability to hold their breath directly interfere with the quality of the images generated.
Both our subscription plans include Free CME/CPD AMA PRA Category 1 credits.
Digital Certificate PDF
On course completion, you will receive a full-sized presentation quality digital certificate.
medtigo Simulation
A dynamic medical simulation platform designed to train healthcare professionals and students to effectively run code situations through an immersive hands-on experience in a live, interactive 3D environment.
medtigo Points
medtigo points is our unique point redemption system created to award users for interacting on our site. These points can be redeemed for special discounts on the medtigo marketplace as well as towards the membership cost itself.
Community Forum post/reply = 5 points
*Redemption of points can occur only through the medtigo marketplace, courses, or simulation system. Money will not be credited to your bank account. 10 points = $1.
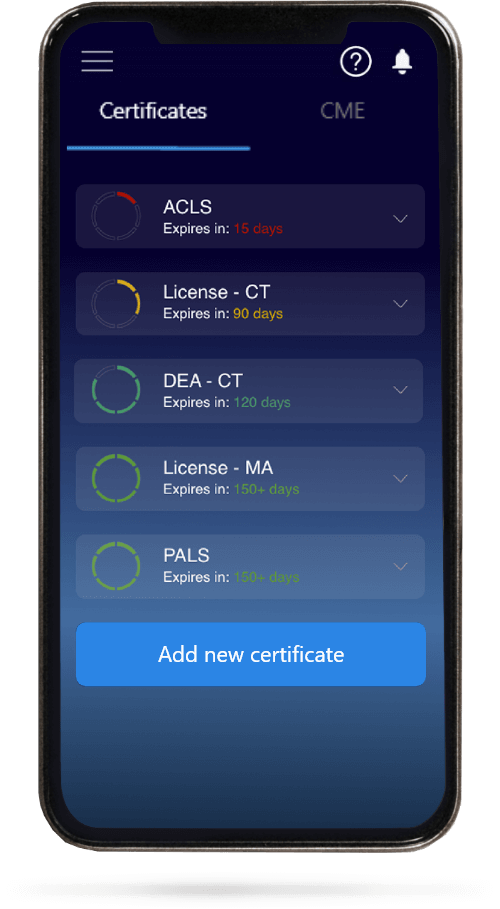
All Your Certificates in One Place
When you have your licenses, certificates and CMEs in one place, it's easier to track your career growth. You can easily share these with hospitals as well, using your medtigo app.