Lumbar puncture, or spinal tap, is obtaining CSF for diagnostic purposes. Heinrich Quincke who first reported the procedure in 1891. So, it was first used to monitor ICP and assess CSF in neurological disorders which led to the development of the continuous monitoring systems. Spinal tap later proved useful in determining diseases such as meningitis, subarachnoid haemorrhage and multiple sclerosis.
Currently, lumbar puncture is widely used to diagnose various diseases of the central nervous system and infections. It assesses CSF pressure, determines the contents of CSF, and introduces treatment substances into the cerebrospinal fluid.
Indications
Central Nervous System Infections: Cerebrospinal fluid analysis using lumbar puncture is helpful to diagnose and monitor some CNS infections like viral or bacterial meningitis, encephalitis or neurosyphilis. The examination of CSF provides information about pathogen detection or changes in the density of cells.
Subarachnoid Hemorrhage: This is crucial in diagnosing bleeding within the subarachnoid area usually resulting from a ruptured aneurysm or a head trauma. This condition is characterized by blood presence in the CSF, and its diagnosis usually points towards subarachnoid hemorrhage.
Evaluating Neurological Disorders: Lumbar puncture can be used in diagnosis of other neurological disorders like multiple sclerosis (MS), and Guillain-Barré syndrome by analyzing the CSF composition, protein and cells for instance.
Assessing Alzheimer’s Disease: At times, lumbar puncture can assist in estimating some biomarkers presumed to represent Alzheimer’s disease.
Contraindications
Increased Intracranial Pressure (ICP): Lumbar puncture is contraindicated where there is an indication of acutely elevated intracranial pressure. In such situations, the general practice of carrying out lumbar puncture can cause brain herniation, which causes severe complications.
Severe Bleeding Disorders: Contraindicated in anybody exhibiting any form of severe bleeding disorders or coagulation abnormalities. These conditions lead to the development of complications such as coagulopathy which leads to bleeding that is uncontrolled at the point of puncture and the development of a spinal hematoma.
Local Infection at the Puncture Site: In assessing the patient, the procedure should not be performed if there is any indication of skin infection or cellulitis at the site of lumbar puncture since this can introduce bacteria into the CSF.
Suspected Spinal Cord Lesions: Lumbar punctures should be avoided if there is a clinical suspicion of a space occupying lesion inside the spinal cord to protect the lesion from potential herniation or injury.
Outcomes
Normal CSF Analysis: A lumbar puncture with normal CSF findings suggests that there are no processes, whether infectious, hemorrhagic, or otherwise pathological, occurring in the central nervous system.
Identification of Pathogens: Identifying certain pathogens (e.g., bacteria, viruses) in the CSF helps direct proper therapy and care in situations of suspected infectious illnesses, such as meningitis.
Analysis of CSF Contents: Lumbar puncture can effectively offer clues for the CSF’s glucose, protein and cell values. Reports with abnormal levels can be related to neurological illnesses.
Blood in CSF (Xanthochromia): Sometimes blood may be present in the CSF, in this case, the CSF will have a yellowish pigment referred to as xanthochromia and these findings may indicate subarachnoid hemorrhage. This may result in subsequent imaging tests to identify the site of bleeding such as CT angiography.
Confirmation of Neurological Disorders: CSF analysis can be helpful if the doctor suspects a specific neurological condition including multiple sclerosis (MS) or Guillain-Barré syndrome, since these disorders produce specific patterns on the CSF tests.
Equipment
Needles
Manometer
Collection Tubes
Syringes
Needle Holder
Sterile Drapes
Gloves and Masks
Antiseptic Solution
Tape and Dressings
Patient Preparation
Informed Consent:
Inform the patient about the procedure details.
Explain the process’s purpose, advantage, disadvantage and available options to the patient.
Obtain written informed consent.
Patient Positioning: Before a lumbar puncture is performed local anesthesia has been administered. To access the interlaminar areas, the patient is positioned in the left or right lateral decubitus position with flexed hips, knees and the chin tucked in towards the chest.
The sitting position could be an acceptable alternative especially for obese patients since the position helps in midline confirmation.
Technique
Step 1: Anatomical Identification Begin by wearing nonsterile gloves. If palpating over the iliac crest and moving your fingers forward and medial to the spine, one feels the prominences that are marking the L3-L4 interspace. Identifying interspace at this level (interspace L3-L4) as well as interspace above it (intervertebral L2-L3) and below it (L4-L5) to compare the result and determine the widest interspace. This will be the part where the choice of the entry area has been selected, one is required to draw a small circle, or a cross using a thumbnail or a marker. Before practicing separating the two adjacent lamina, direct the patient to apply outward force at the labelled region.
Now that the spinal tray is open, set up the sterile apparatus.
Preparing the equipment involves unpacking the tubes and arranging them in an upright position as per the numbers on them. Connect and tighten the stopcock on the manometer and take 10-mL syringe filled with lidocaine.
Step2: Skin Preparation Obtain skin swabs and an antiseptic solution which is then rubbed gently in circular motion across the abdominal area starting at L3 L4 interspace down through one interspace above as well as one interspace below.
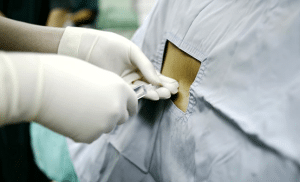
It is crucial to notify patients about the extremely cold nature of the solution before applying skin swabs, since rapid contact with an unexpectedly cold solution might cause pain. Place a sterile sheet below the patient and place a fenestrated sheet over them.
Most of the available spinal trays are designed to incorporate fenestrated drapes with adhesive tape.
Step3: Local Anesthesia
Use a 10 ml syringe to administer local anesthesia. Start with a 25-gauge needle to create a skin wheal, then switch to a 20-gauge needle for deeper tissues. Insert the needle fully until it reaches the hub. Aspirate to ensure it’s not in a blood vessel and inject a small amount while retracting a few centimeters. Repeat this technique above, below, and to the sides, using the same puncture site. This thorough anesthetization ensures the entire area is numb if the spinal needle needs repositioning. A 10 ml syringe is more beneficial than a 3ml syringe for lumbar puncture. The 20-gauge needle helps guide the spinal needle’s direction, indicating the best path to avoid bone.
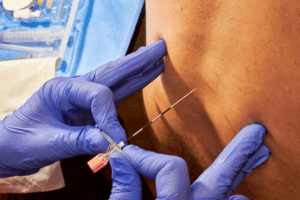
Step 4: Needle Insertion
Insert the needle in a cephalad direction into the abdominal wall using a mild angle towards the position of the umbilicus. Progress the needle gradually and smoothly. Sometimes, you feel a distinct ‘pop’ which tells you that you have penetrated through the dura. If no such sensation is felt, after penetrating the tissue about 4-5 cm in depth, the stylet should be pulled back and checked for any trace of blood ooze. If there is no return of fluid, properly replace the stylet into the needle and slightly adjust its position by moving it in and out several millimeters, then try aspirating the fluid return. This should be done until fluid is collected successfully to avoid contamination from the surrounding environment by other bacteria which may lead to a wrong diagnosis.
In practice, the patient should remain in the lateral recumbent position to obtain opening pressure. After drawing fluid into the needle, connect the manometer via a stopper cock and read the height of fluid column. There is some important requirement that must be fulfilled, specifically when making this measurement, the patient’s legs should be straight, if they are bent in any way, the pressure reading will be higher.
Step 5: Collection of CSF
Collect at least ten drops of cerebrospinal fluid in each of four plastic tubes, starting with tube one. Use CSF from the manometer for tube one if possible. If CSF flow is slow, have the patient cough or an assistant press on the abdomen, or rotate the needle 90° so the bevel faces upward. After collecting the samples, replace the stylet, withdraw the needle, clean the skin, apply a sterile dressing, and position the patient supine.
Laboratory Tests
Analysis of Cerebrospinal Fluid (CSF): Examining the obtained CSF for different diagnostic objectives is known as CSF analysis. Cytologic Studies: Cell Count: CSF is used to count cells and thus indicate the presence of an infection or inflammation in the central nervous system. Although WBC is normal, higher counts may indicate infection or inflammation, as for the RBC could be attributed to the puncture that was involved in the LP. Differential Cell Count: The high levels of neutrophils over lymphocytes may also assist in distinguishing if the base cause of inflammation is bacterial or viral in nature. Cytology: CSF cytology is the activity pointing to the presence of inconformity in the cells of the CSF that includes the cancer cells. Some conditions such as leptomeningeal metastases should be known and therefore diagnosed.
Complications
Post-Dural Puncture Headache (PDPH): This is the most common complication, and it refers to a situation where a severe headache occurs while one is sitting or standing but reduces when the person is lying down. There are often determined by leakage of cerebrospinal fluid out of the puncture wound site.
Back Pain: There is frequent back discomfort in some of the patients, but this is only a moderate one that fades away after some time of sleep and with the use of some available pain killers.
Nerve Damage: Trauma or harm to spinal nerves is very rarely witnessed, but in the event, it is, neurological manifestations may be distinguished.
Herniation: During lumbar puncture in patients with raised intracranial pressure, there is a risk that a sudden drop in cerebral fluid pressure might cause brain herniation.
Bleeding: Rarely, bleeding into the CSF fluid or at the site of the puncture may happen. This may result in a “bloody tap” or blood in the cerebral fluid.
Infection: Despite strict aseptic procedures, there is minimal chance of bacteria entering the CSF.
Medication
Local Anesthetics: Lidocaine or Bupivacaine
Contrast Agents: iohexol (Omnipaque)
Chemotherapeutic Drugs:Methotrexate or cytarabine
Antibiotics and Antivirals: If a bacterial or viral infection in the central nervous system is suspected, antibiotics (e.g., ceftriaxone) or antiviral drugs (e.g., acyclovir) can be introduced into the CSF.
Lumbar puncture, or spinal tap, is obtaining CSF for diagnostic purposes. Heinrich Quincke who first reported the procedure in 1891. So, it was first used to monitor ICP and assess CSF in neurological disorders which led to the development of the continuous monitoring systems. Spinal tap later proved useful in determining diseases such as meningitis, subarachnoid haemorrhage and multiple sclerosis.
Currently, lumbar puncture is widely used to diagnose various diseases of the central nervous system and infections. It assesses CSF pressure, determines the contents of CSF, and introduces treatment substances into the cerebrospinal fluid.
Central Nervous System Infections: Cerebrospinal fluid analysis using lumbar puncture is helpful to diagnose and monitor some CNS infections like viral or bacterial meningitis, encephalitis or neurosyphilis. The examination of CSF provides information about pathogen detection or changes in the density of cells.
Subarachnoid Hemorrhage: This is crucial in diagnosing bleeding within the subarachnoid area usually resulting from a ruptured aneurysm or a head trauma. This condition is characterized by blood presence in the CSF, and its diagnosis usually points towards subarachnoid hemorrhage.
Evaluating Neurological Disorders: Lumbar puncture can be used in diagnosis of other neurological disorders like multiple sclerosis (MS), and Guillain-Barré syndrome by analyzing the CSF composition, protein and cells for instance.
Assessing Alzheimer’s Disease: At times, lumbar puncture can assist in estimating some biomarkers presumed to represent Alzheimer’s disease.
Increased Intracranial Pressure (ICP): Lumbar puncture is contraindicated where there is an indication of acutely elevated intracranial pressure. In such situations, the general practice of carrying out lumbar puncture can cause brain herniation, which causes severe complications.
Severe Bleeding Disorders: Contraindicated in anybody exhibiting any form of severe bleeding disorders or coagulation abnormalities. These conditions lead to the development of complications such as coagulopathy which leads to bleeding that is uncontrolled at the point of puncture and the development of a spinal hematoma.
Local Infection at the Puncture Site: In assessing the patient, the procedure should not be performed if there is any indication of skin infection or cellulitis at the site of lumbar puncture since this can introduce bacteria into the CSF.
Suspected Spinal Cord Lesions: Lumbar punctures should be avoided if there is a clinical suspicion of a space occupying lesion inside the spinal cord to protect the lesion from potential herniation or injury.
Normal CSF Analysis: A lumbar puncture with normal CSF findings suggests that there are no processes, whether infectious, hemorrhagic, or otherwise pathological, occurring in the central nervous system.
Identification of Pathogens: Identifying certain pathogens (e.g., bacteria, viruses) in the CSF helps direct proper therapy and care in situations of suspected infectious illnesses, such as meningitis.
Analysis of CSF Contents: Lumbar puncture can effectively offer clues for the CSF’s glucose, protein and cell values. Reports with abnormal levels can be related to neurological illnesses.
Blood in CSF (Xanthochromia): Sometimes blood may be present in the CSF, in this case, the CSF will have a yellowish pigment referred to as xanthochromia and these findings may indicate subarachnoid hemorrhage. This may result in subsequent imaging tests to identify the site of bleeding such as CT angiography.
Confirmation of Neurological Disorders: CSF analysis can be helpful if the doctor suspects a specific neurological condition including multiple sclerosis (MS) or Guillain-Barré syndrome, since these disorders produce specific patterns on the CSF tests.
Needles
Manometer
Collection Tubes
Syringes
Needle Holder
Sterile Drapes
Gloves and Masks
Antiseptic Solution
Tape and Dressings
Informed Consent:
Inform the patient about the procedure details.
Explain the process’s purpose, advantage, disadvantage and available options to the patient.
Obtain written informed consent.
Patient Positioning: Before a lumbar puncture is performed local anesthesia has been administered. To access the interlaminar areas, the patient is positioned in the left or right lateral decubitus position with flexed hips, knees and the chin tucked in towards the chest.
The sitting position could be an acceptable alternative especially for obese patients since the position helps in midline confirmation.
Step 1: Anatomical Identification Begin by wearing nonsterile gloves. If palpating over the iliac crest and moving your fingers forward and medial to the spine, one feels the prominences that are marking the L3-L4 interspace. Identifying interspace at this level (interspace L3-L4) as well as interspace above it (intervertebral L2-L3) and below it (L4-L5) to compare the result and determine the widest interspace. This will be the part where the choice of the entry area has been selected, one is required to draw a small circle, or a cross using a thumbnail or a marker. Before practicing separating the two adjacent lamina, direct the patient to apply outward force at the labelled region.
Now that the spinal tray is open, set up the sterile apparatus.
Preparing the equipment involves unpacking the tubes and arranging them in an upright position as per the numbers on them. Connect and tighten the stopcock on the manometer and take 10-mL syringe filled with lidocaine.
Step2: Skin Preparation Obtain skin swabs and an antiseptic solution which is then rubbed gently in circular motion across the abdominal area starting at L3 L4 interspace down through one interspace above as well as one interspace below.
It is crucial to notify patients about the extremely cold nature of the solution before applying skin swabs, since rapid contact with an unexpectedly cold solution might cause pain. Place a sterile sheet below the patient and place a fenestrated sheet over them.
Most of the available spinal trays are designed to incorporate fenestrated drapes with adhesive tape.
Step3: Local Anesthesia
Use a 10 ml syringe to administer local anesthesia. Start with a 25-gauge needle to create a skin wheal, then switch to a 20-gauge needle for deeper tissues. Insert the needle fully until it reaches the hub. Aspirate to ensure it’s not in a blood vessel and inject a small amount while retracting a few centimeters. Repeat this technique above, below, and to the sides, using the same puncture site. This thorough anesthetization ensures the entire area is numb if the spinal needle needs repositioning. A 10 ml syringe is more beneficial than a 3ml syringe for lumbar puncture. The 20-gauge needle helps guide the spinal needle’s direction, indicating the best path to avoid bone.
Step 4: Needle Insertion
Insert the needle in a cephalad direction into the abdominal wall using a mild angle towards the position of the umbilicus. Progress the needle gradually and smoothly. Sometimes, you feel a distinct ‘pop’ which tells you that you have penetrated through the dura. If no such sensation is felt, after penetrating the tissue about 4-5 cm in depth, the stylet should be pulled back and checked for any trace of blood ooze. If there is no return of fluid, properly replace the stylet into the needle and slightly adjust its position by moving it in and out several millimeters, then try aspirating the fluid return. This should be done until fluid is collected successfully to avoid contamination from the surrounding environment by other bacteria which may lead to a wrong diagnosis.
In practice, the patient should remain in the lateral recumbent position to obtain opening pressure. After drawing fluid into the needle, connect the manometer via a stopper cock and read the height of fluid column. There is some important requirement that must be fulfilled, specifically when making this measurement, the patient’s legs should be straight, if they are bent in any way, the pressure reading will be higher.
Step 5: Collection of CSF
Collect at least ten drops of cerebrospinal fluid in each of four plastic tubes, starting with tube one. Use CSF from the manometer for tube one if possible. If CSF flow is slow, have the patient cough or an assistant press on the abdomen, or rotate the needle 90° so the bevel faces upward. After collecting the samples, replace the stylet, withdraw the needle, clean the skin, apply a sterile dressing, and position the patient supine.
Analysis of Cerebrospinal Fluid (CSF): Examining the obtained CSF for different diagnostic objectives is known as CSF analysis. Cytologic Studies: Cell Count: CSF is used to count cells and thus indicate the presence of an infection or inflammation in the central nervous system. Although WBC is normal, higher counts may indicate infection or inflammation, as for the RBC could be attributed to the puncture that was involved in the LP. Differential Cell Count: The high levels of neutrophils over lymphocytes may also assist in distinguishing if the base cause of inflammation is bacterial or viral in nature. Cytology: CSF cytology is the activity pointing to the presence of inconformity in the cells of the CSF that includes the cancer cells. Some conditions such as leptomeningeal metastases should be known and therefore diagnosed.
Post-Dural Puncture Headache (PDPH): This is the most common complication, and it refers to a situation where a severe headache occurs while one is sitting or standing but reduces when the person is lying down. There are often determined by leakage of cerebrospinal fluid out of the puncture wound site.
Back Pain: There is frequent back discomfort in some of the patients, but this is only a moderate one that fades away after some time of sleep and with the use of some available pain killers.
Nerve Damage: Trauma or harm to spinal nerves is very rarely witnessed, but in the event, it is, neurological manifestations may be distinguished.
Herniation: During lumbar puncture in patients with raised intracranial pressure, there is a risk that a sudden drop in cerebral fluid pressure might cause brain herniation.
Bleeding: Rarely, bleeding into the CSF fluid or at the site of the puncture may happen. This may result in a “bloody tap” or blood in the cerebral fluid.
Infection: Despite strict aseptic procedures, there is minimal chance of bacteria entering the CSF.
Local Anesthetics: Lidocaine or Bupivacaine
Contrast Agents: iohexol (Omnipaque)
Chemotherapeutic Drugs:Methotrexate or cytarabine
Antibiotics and Antivirals: If a bacterial or viral infection in the central nervous system is suspected, antibiotics (e.g., ceftriaxone) or antiviral drugs (e.g., acyclovir) can be introduced into the CSF.
Both our subscription plans include Free CME/CPD AMA PRA Category 1 credits.
Digital Certificate PDF
On course completion, you will receive a full-sized presentation quality digital certificate.
medtigo Simulation
A dynamic medical simulation platform designed to train healthcare professionals and students to effectively run code situations through an immersive hands-on experience in a live, interactive 3D environment.
medtigo Points
medtigo points is our unique point redemption system created to award users for interacting on our site. These points can be redeemed for special discounts on the medtigo marketplace as well as towards the membership cost itself.
Community Forum post/reply = 5 points
*Redemption of points can occur only through the medtigo marketplace, courses, or simulation system. Money will not be credited to your bank account. 10 points = $1.
All Your Certificates in One Place
When you have your licenses, certificates and CMEs in one place, it's easier to track your career growth. You can easily share these with hospitals as well, using your medtigo app.